Showing posts with label cake. Show all posts

Thursday, 29 March 2012

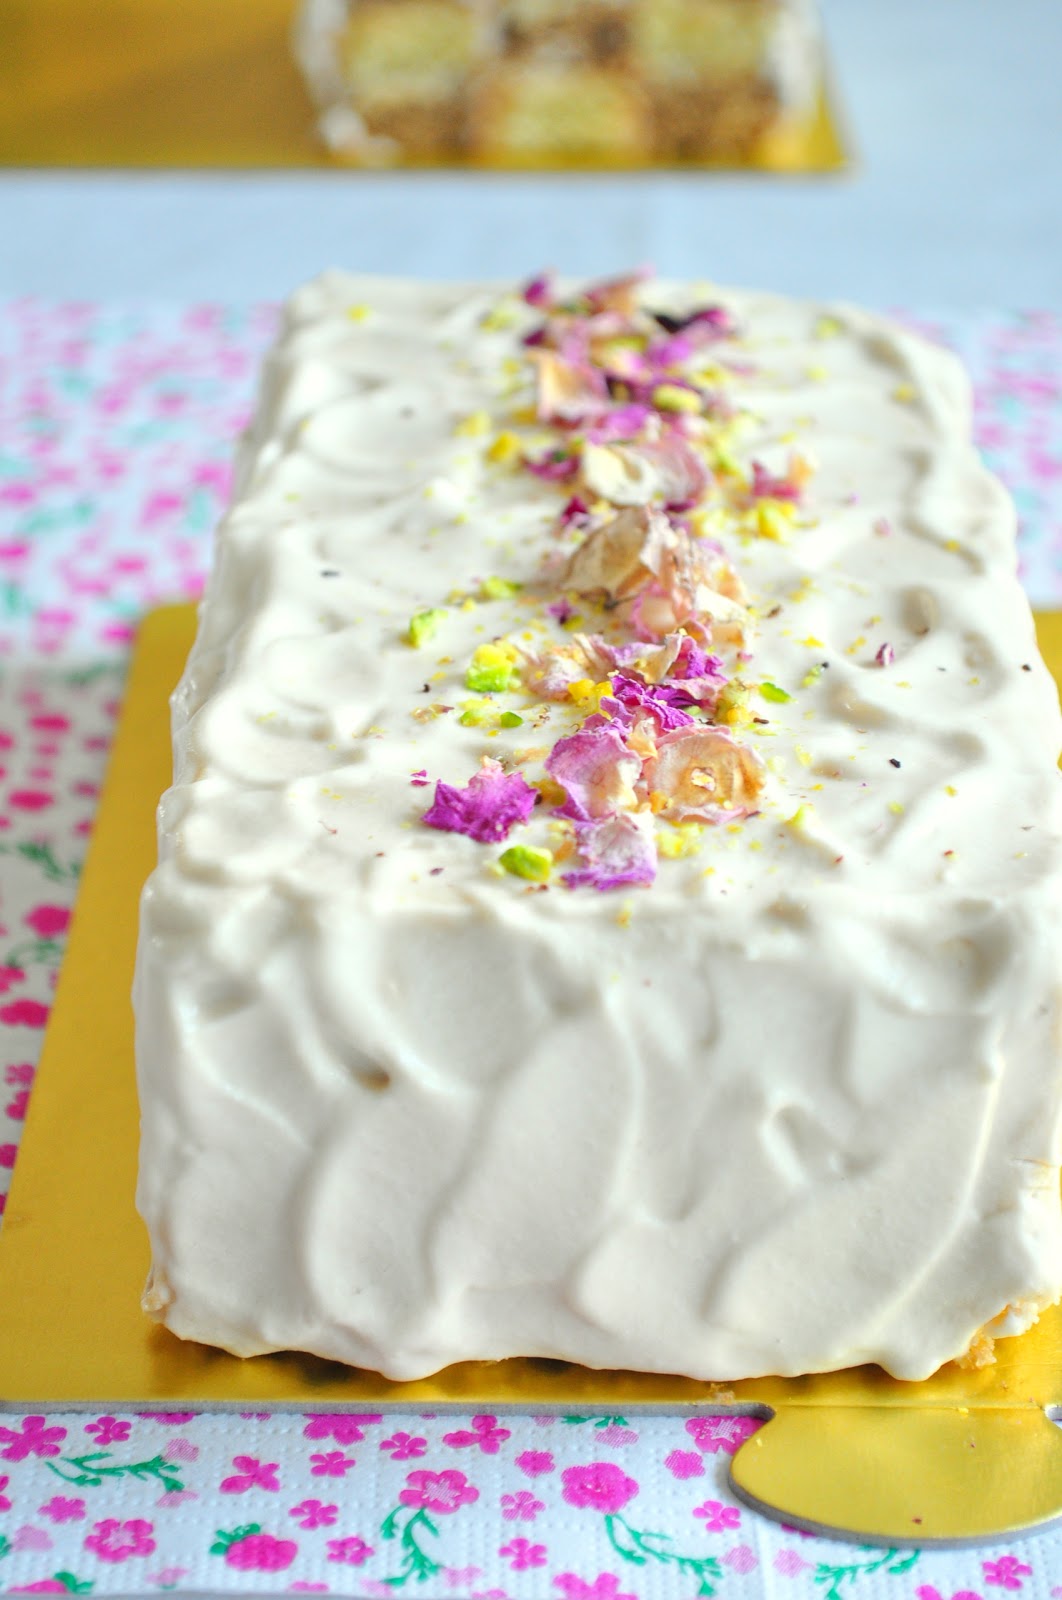
Citrus & coffee checkered loaf with coffee flavored chantilly cream, and snippets of Switzerland


Week before last was all about enjoying the start of spring in Herr Scherrer's home country, Switzerland.  White snow had given way to a beautiful mix of green, brown and red all around lake Zurich and nearby towns and cities.  The skies were clear blue for the entire time we were there.  It was lovely to enjoy the abundant nature and country side (something we don't get much of in Hong Kong).  We've been making regular trips to Switzerland for a number of years now, and its always something I look forward to very much.  Who knows maybe one day we'll decide to make it home? When there are kids to think of perhaps?


We went to our usual favorite food haunts, e.g. Brasserie Lipp, Schlüssel poulet, just to name a few.  There were of course the must-do visits to Sprüngli and Ladurée and Läderach. Yum yum!


We also spent a few days in Zermatt, where there were still plenty of snow for skiing on the slopes from the Klein Matterhorn and Gornegrat.  As you can see in the picture below, there was not a single cloud in the sky!  


We took lazy drives out to catch sights of the Rhine river, stopping for relaxing bites along the way and just simply enjoying the fresh air and good weather. 


And there were lazy strolls through old streets of Schaffhausen, admiring the intricate artwork on the external walls of buildings.


Upon returning to Hong Kong I made a citrus and coffee flavored checkered loaf cake using fatless whisked sponge.  There is no butter or oil in the sponge recipe.  I paired it with coffee flavored chantilly cream, topped with dried rose petals and crushed pistachios.  The resulting presentation makes it so suitable for Spring, don't you think?


Recipe below makes 2 mini checkered loaf measuring approximately 7" by 3.5" each

Fatless whisked sponge cake:
4 eggs
160g sugar
140g all-purpose flour
pinch of salt
1 tbls instant coffee powder
grated rind of 1 orange

Coffee flavoured creme chantilly:
320g whipping cream
75g granulated sugar
1 tsp instant coffee powder

Decoration:
dried rose petals
crushed pistachios

1. For the coffee flavored whisked sponge cake: Dissolve instant coffee powder in 1 tbls boiling water and set aside to cool slightly.  Whisk 2 eggs, 80g sugar and coffee mixture in heatproof bowl to mix in the ingredients.  Placing bowl over a pan of hot water and continue to whisk egg mixture till its turns pale and holds a clear trail of ribbon batter on surface.  Remove bowl from pan and continue to whisk till mixture cools.  Fold in 70g flour in 3 batches.  Pour into lined / greased pan (I used a 8" by 8" size square pan) and bake for 15 to 17 minutes in 170C preheated oven until sponge is firm but springy.  Transfer cooked sponge to cool on wire rack.  
2. For the citrus flavored whisked sponge cake: Follow the same procedure above with remaining 2 eggs and 80g sugar, except replacing coffee mixture with grated orange rind.
3. For the creme chantilly: Put all ingredients in a mixing bowl.  Whisk on medium speed till cream is thick enough to spread (slightly more than soft peak). 
4. Assembly: cut and trim each of the coffee and citrus sponge into 9 pieces of 1.5cm tall strips, i.e. 9 strips of coffee sponge and 9 strips of citrus sponge.  Arrange strips to form 2 checkered loaf, using 9 strips per loaf (strips are placed 3 by 3 with longer edge on the horizontal plane - see photos). Ensure the coffee and citrus strips alternate to create checkered effect and fill with creme chantilly between the strips to hold them together.  Using a spatula, frost top and sides of checkered loaf with remaining creme chantilly.  Finish with back of a spoon to create textured surface.  Top with dried rose petals & crushed pistachios (or any other decorative items u desire).


Friday, 9 March 2012

Coffee & caramel mousse cake

I first heard about Hidemi Sugino's book "Le goût authentique retrouvé" in 2005 from Keiko, on her blog.  This was before I knew about his shop in Tokyo.  Keiko is such a talented baker and I've been so inspired reading about Keiko's many creations from Le goût authentique retrouvé.  I've always had a special spot for these pretty multi-layered/textured pretty french-style mousse cakes (or simply entrements as some may call it).  Unfortunately, Hidemi Sugino's book is in Japanese and given he hasn't release an English version since the book was first commissioned in 1998, it is unlikely he will ever do so. 


So fast forward seven years to 2012, a few months ago I was researching into a coffee and caramel mousse cake combination and couldn't really find anything good among all the cookbooks and materials I've gathered over the years (unbelievable as it may sound for the number of cookbooks I have).  I knew Hidemi Sugino had one in his book as Keiko blogged about it before.  Its one called Brésilienne that he still offers it  in his patisserie shop.  Japanese-literate or not, I decided I'll get the book first and think more later.  I knew from Keiko that the ingredients were also listed in French, so at the minimum I would be able to understand that bit. 

The book arrived 3 days later and I was so elated to find it containing many recipes for different mousse cakes and they all look so delicious.  There is so much in the book I can't wait to try.  Although its all in Japanese, there are step by step photos accompanying the recipes.  True I couldn't understand the methodology written in Japanese, but based on the ingredients, it wasn't that difficult figuring out on my own what to do with the ingredients.  The step-by-step photos also help.  


So I finally got to try a coffee and caramel mousse combination thanks to Hidemi Sugino.  And I was truly impressed!  The coffee mousse tasted a little bitter on its own, but when paired with the sweet caramel mouse, it was a surprise burst of flavor on the palate.  The coffee biscuit joconde was also very moist given all the cognac syrup that was added to it, and complimented both mousses well.


The cake ring that Hidemi Sugino uses is almost impossible to find - I had to settle on an oval shaped one which made the cake look like a fat version of his tall & slim model.   I could have also done better on the proportion of coffee to caramel mousse so that the 2 layers are of equal height.  Lastly, I believe Hidemi Sugino uses very little gelatin in his recipes so his mousses are very soft and lovely, which was indeed the case when I tried this recipe, but the downside is it may not last a trip out of the house, especially in more hot & humid weathers.  I will most likely increase the proportion of gelatin next time, especially if I know the cake will need to do some travelling.

Its been nothing but gloomy cloudy days in Hong Kong the past week and I was really frustrated trying to find enough natural light to take some of these photos... hopefully they don't look too gloomy to you.

Continue for recipe:

Monday, 13 February 2012

Azuki mousse & matcha genoise cake


I had another Japanese themed inspiration following one of my recent post here of sesame chiffon cake and Niseko, Japan. 


This time, its azuki beans.  I've always had something for azuki bean flavored desserts.  My dad loves those asian style azuki bean ice popsicles and as a kid I would often find some in the freezer at home.  It was a memorable cold treat after a hot sunny day in Singapore.


I wanted to recreate the childhood memory, and an important part of it is using whole beans (sweetened from a can) instead of azuki bean puree, so that one could enjoy the munch of whole beans, resembling the taste of whole azuki beans in the ice popsicles my dad used to buy.


Everthing else was kept simple to ensure the taste of azuki beans were clearly distinct.  The azuki bean mousse was paired with matcha génoise. 


Recipe below makes about 4 mini cakes

Matcha génoise:
2 egg
40g granulated sugar
35g plain flour, sifted
7g matcha powder (sifted together with flour)
20g butter
(There will be left over génoise but I find its easier to work with these quantities than something smaller.  You could half the ingredients and there would still be enough génoise for about 4 mini cakes.  Extra génoise can be wrapped in plastic and kept in the fridge for other uses.)

Preheat oven to 180 C.  Hand-whisk eggs and sugar over bain marie till mixture reaches 40 C.  Using an electrical whisk, beat eggs and sugar on high speed till fluffy and peaks form.  Melt butter over bain marie.  Fold flour & matcha into egg mixture in 3 batches.  Be careful not to overmix. Add a scoop of egg & flour mixture into melted butter and mix well.  Fold butter mixture back into remaining egg & flour mixture and fold gently till batter surface is uniformly shiny.  Pour & spread evenly into approximately 8 by 11 inch lined cake tin and bake for about 16 to 18 mins (if you are using half the quantity, use a smaller cake tin so your génoise would still have sufficient thickness).  Invert cake onto a wire rack and let cool before cutting out pieces of génoise rounds (or squares depending on your cake ring) that is slightly smaller than the cake ring you are using.  Place génoise rounds at the bottom of lined cake rings.  Set aside.

Azuki mousse:
2 gelatin sheets
180g azuki beans, sweetened (from a can)
180g whipping cream

Soak gelatin sheets in cold water till bloomed. Melt gelatin over bain marie and stir into azuki beans.  Whisk cream on medium speed till soft peak forms.  Fold cream into azuki beans mixture.  Pour over matcha génoise in cake rings and leave it fridge until set.

Finish:
Remove mousse from cake ring (using hot towel or flame torch on external of ring to loosen mousse).  Wrap with dark chcolate and top with fruits and sprinkle of crushed pistachios as desired.


Tuesday, 31 January 2012

Sesame chiffon cake with vanilla frosting and a trip to Niseko


We spent the week before the Chinese New Year snowboarding for 6 days in the powder paradise of Niseko in Hokkaido, Japan.  Niseko gets an average annual snowfall of around 15m and everywhere we looked it was meters tall of white, giving new meaning to the term "winter wonderland".  Its our second trip to Niseko and it's almost certain that we'll visit again during the winter of 2013.

Other than plenty of powder snow on the ski slopes, we loved being in Niseko due to the great variety of amazing good food, all within the small town of Niseko Hirafu.  We had so many good meals that I didn't lose any weight despite 6 consecutive days of physical exercise on the ski slopes.

One afternoon we explored the little adjacent village of Izumikyo and found a lovely cosy cafe called "Mozart".  Run by a Japanese lady, Akiko Shimono, it is the sweetest cafe I've been in and truly reminded me a little of Vienna.  She served us some really good coffee and a yummy apple crumble with Hokkaido milk ice cream.


Going with the Japanese theme, upon returning home I got round to trying a sesame chiffon cake recipe from a book by Keiko Ishida.  I'm usually not into frosting but this vanilla frosting surprised me with how nicely it paired with the sesame chiffon which is mildly sweet and taste strongly of sesame.  There are also whole sesame seeds embedded within the soft chiffon adding a surprise crunch when one munches into it.


Unfortunately I'm still not too good with frosting cakes and made a bit of a mess with the uneven layer of frosting over the top and sides.  I also think an 8 inch pan would have produced a taller, prettier cake but I only have a 9 inch pan at home.


Recipe below makes 1 cake, adapted from "Okashi" by Keiko Ishida
(I used a 9 inch round tube pan.  Using a 8 inch pan would produce a taller cake)

70g plain flour
5 egg yolks
20g brown sugar
20g black sesame paste
60g water
40g canola oil
20g sesame seeds (optional)
90g granulated sugar
10g cornstarch
180g egg whites (about 5 to 6 eggs)

For the vanilla frosting:

200g whipping cream
15g granulated sugar
1/2 tsp vanilla essence

Sift flour.  Whisk egg yolks, brown sugar, black sesame paste, water and canola oil in bowl till well mixed.  Fold in flour into egg yolk mixture till its properly incorporated - flour may appear lumpy at first but keep folding till smooth.  Don't be afraid to stir the flour in if necessary.  Set aside.
Place egg whites in bowl of electric mixer and beat on high speed till foamy.  Add granulated sugar and cornstarch in 2 batches while continuing to beat till glossy meringue forms with stiff peaks.  Gently fold meringue into egg yolk & flour mixture one-third at a time.  Be careful not to overmix.
Pour batter into round tube pan and bake in 160C preheated oven for 45 minutes.  Leave cake to cool in pan inverted (this is important).  Remove cake from pan only when it has completely cooled.  Coat with vanilla frosting and decorate as desired. 

Vanilla frosting: Place whipping cream, granulated sugar and vanilla essence into mixer bowl and whisk on medium speed till stiff peaks form. 

Saturday, 7 January 2012

Raspberry mousse & vanilla cream cake

We couldn't get enough of the Christmas and New Year celebrations.  Two long weekends in a row was a luxury.  Dragging myself back to work on 3 January was not a pleasant experience.  Thankfully, I have the Chinese New Year holidays towards the end of January to look forward to - that will be another 5 consecutive days of holidays.

I made these raspberry mousse and vanilla cream mini cakes for New Year's Day for some friends who came over for dinner.  We had a little make-your-own-pizza party.  I had the dough prepared in advance, but each pair had to roll it out and decide on the toppings.  It was a lot of hands-on fun and laughs, especially when the last pizza was improvised into a calzone.  A great way to celebrate the start of 2012.

 
I served these mini cakes at the end of the evening while we sat around the table for some green tea and black fruity tea.  It may not be quite the expected dessert after some home-made pizza, but the raspberry mousse and vanilla cream are both light to the palate and not heavy at all.  It was also not overly sweet so one could really taste the raspberry and vanilla flavour separately.  I also added mini crunchy chocolate balls into the vanilla cream layer for additional texture.

Wishing all of you a good 2012 ahead!

 Recipe below makes 12 pieces using 6-cm round cake rings

Butter génoise:
2 eggs
40g granulated sugar
40g plain flour, sifted
20g unsalted butter, melted

Preheat oven to 180 C.  Hand-whisk eggs and sugar over bain marie till mixture reaches 40 C.  Using an electrical whisk, beat eggs and sugar on high speed till fluffy and peaks form.  Melt butter over bain marie.  Fold flour into egg mixture in 3 batches.  Be careful not to overmix. Add a scoop of egg & flour mixture into melted butter and mix well.  Fold butter mixture back into remaining egg & flour mixture and fold gently till batter surface is uniformly shiny.  Pour into 9-inch lined round cake tin and bake for 18 mins.  Invert cake onto a wire rack and let cool before cutting out 12 pieces of 5-cm génoise rounds.  Place génoise rounds at the bottom of 12 lined 6-cm round cake rings.  Set aside.

Vanilla cream layer:
6 tbls milk
2 vanilla beans
2 tbls sugar
2 egg yolks
1 tsp cornstarch
1 tsp custard powder
4.5 gelatin sheets
90g heavy cream
70g granulated sugar (for the italian meringue)
13g water (for the italian meringue)
45g egg white (for the italian meringue)
around 100 pieces of mini crunchy chocolate balls (optional)

Soak gelatin leaves for a few minutes in cold water till bloomed.  Split vanilla beans lengthwise and scrape the seeds into milk.  Heat milk in a small saucepan but do not bring to boil.  Whisk yolks, sugar, cornstarch and custard powder together, then mix in a little of the heated milk, mixing till well blend.  Pour mixture back into saucepan with remaining milk and simmer slightly, stirring constantly.  Remove from heat and add gelatin, mix well.  Set aside to cool.

Whip heavy cream till soft peaks form.  Set aside in fridge, covered.

Prepare the italian meringue: Whisk egg whites using an electric mixer till soft peaks form.  At the same time, heat sugar and water in a small saucepan over medium to high heat.  Use a thermometer to measure the syrup, cooking the sugar syrup till it reaches 118C.  Carefully pour the sugar syup into the mixer bowl with egg whites while running the whisk.  Continue whisking till stiff peaks form and the meringue has cooled down and is glossy.  

Fold italian meringue into milk mixture, then fold in the whipped cream to finish the vanilla cream.

Pour vanilla cream over génoise rounds placed at the bottom of 12 lined 6-cm round cake rings.  The vanilla cream should properly cover the sides and top of the génoise rounds.  Optional: divide the mini crunchy chocolate balls evenly between the cake rings, pressing them into the vanilla cream.  

Leave cake rings to chill in fridge till the vanilla cream has set before removing them from the cake rings (using hot towel or flame torch). 

Raspberry mousse dome:
1 1/2 pieces gelatin sheet
135g raspberry puree
140g heavy cream
55g sugar
25g corn syrup
20g water
50g egg whites

Soak gelatin leaves for a few minutes in cold water till bloomed.  Heat half of raspberry puree in a small saucepan, stirring.  Do not bring to boil.  Remove puree from heat and add gelatin, stirring to dissolve.  Add remaining puree and mix well.  Set aside to cool.

Whip heavy cream till soft peaks form.  Set aside in fridge, covered.

Whisk egg whites using an electric mixer on high speed till soft peak forms.  At the same time, heat sugar, corn syrup and water in a small saucepan over medium to high heat.  Use a thermometer to measure the syrup, cooking the sugar syrup till it reaches 118C.  Carefully pour the sugar syup into the mixer bowl with egg whites while running the whisk.  Continue whisking till stiff peaks form and the meringue has cooled down and is glossy. 

Pour cooled puree over meringue and fold in using a spatula. When the puree has been incorporated, fold in the whipped cream till mousse is just blended evenly.

Pour mousse into 12 pieces of 6-cm dome molds and leave in fridge till set. 

Assembly:  
Gently remove raspberry mousse from dome molds one at a time (by carefully dipping bottom of molds in hot water, taking care not to allow water into the mousse, and rotating the mousse out of the molds), and immediately place mousse dome on top of the vanilla cream layer.  Repeat for remaining 11 pieces.  Wrap exterior of individual mini cakes with dark chocolate decoration and top with pistachios if desired, as shown in photos.

Sunday, 4 September 2011

A quick approach to raspberry cheesecake


We had some guests over for dinner last Saturday evening and I didn't have time to start working on any sort of dessert till about 3pm in the afternoon...  I had a fresh tub of Ben & Jerry vanilla ice cream in the freezer which could certainly pass off as dessert, but I think my guests expected much more out of me.  At least i would... 

So what do i do??  I know most cheesecake recipes advise the need to refrigerate for at least 6 hours or overnight, but the preparation itself is almost too quick & easy... it was all I could manage in the 1.5 hours before my guests were due to arrive... After some consideration I decided to take the risk! After all, if the cheesecake is not ready in time, I will still have the B&J ice cream as back up.

I used a fairly common baked cheesecake recipe that I've tried before (http://www.marthastewart.com/340227/raspberry-swirl-cheesecake).  My preference is always the water bath method which eliminates the chances of cracks and cooks the cheesecake gently.


There are tons of tutorials and guides available out there for cheesecakes, but here's three points I personally feel is most important:
1) Rely on the water bath method
2) Beat the mixture as little as possible once adding the eggs, as excessive beating will cause the eggs to trap air, thereby increasing the chance of cracks
3) Leave the cheesecake in the oven for another hour or so after turning off the oven.  This allows the cheesecake to be further "cooked". 


Was my cheesecake done in time for serving?  After cooling it for about 1 hour at room temperature, I popped it into the freezer for about 2.5 hours throughout the entire time we had dinner.  Once we were done with dinner I removed it from the freezer, removed the cake ring and served it straightaway with some left over raspberry puree that was also chilled in the fridge throughout dinner.

The cheesecake was perfectly fine even though it hadn't been refrigerated for 6 hours or overnight.  A couple of my guests took a second serving!  Given a choice, I wouldn't try something this last minute again, but it was good that everything turned out right just in time... Whew! 

I took this shot below of the entire cake before it was cut and served.  The rest of the shots above I took the day after with a few leftover pieces.


Thursday, 25 August 2011

Streusel coffee cake with peaches... and some photos from the last few months of absence

Its been so long since my last post that I got a surprise logging into blogger - Its got a fresh new look! I think I like it, though its taking me a bit more time to navigate around looking for the right buttons.

I don't really have a good reason for not blogging the last few months.  Its not like I've stopped having fun in the kitchen - I just haven't been motivated to take photos and documenting the experience.  One contributing factor is I've been baking / cooking more towards the evening so there is not much daylight available for pictures, and I still haven't quite figured out how to work around the mood lighting we have at home.  Another "excuse" (if marginally acceptable) is the unbearably hot and extremely humid summer weather we've been getting here in Hong Kong - it makes me lazy!  Though it also means we've been getting quite a bit of days with clear blue skies - see photos below (part of the Victoria Harbor taken from the 75th floor of International Commerce Centre;).  Ironically, as I'm writing this the sky outside is turning grey and gloomy, and a thunderstorm is clearly brewing...


Let's me get back to the title of this blog before we continue to digress: I made a peach streusel coffee cake last Saturday afternoon and managed to squeeze in this shot (below) next to the window  right before sunset.  I had some peaches at home that were fully ripen, and found this recipe on the internet: http://www.williams-sonoma.com/recipe/peach-streusel-coffee-cake.html.  Its the first time I've made something with streusel - I used 1/4 instead of 1/3 cup of brown sugar specified in the recipe as I didn't want something too sweet.  In my next attempt I would also reduce the amount of granulated sugar slightly as well.  The coffee cake was moist and blended beautifully with the peaches and streusel.  Truly perfect for an afternoon snack with coffee or tea, especially after a good swim under clear blue skies!  


So what else have I been up to this summer?  I only have a couple of fairly decent shots to share; mostly taken late in the evening, so I hope you'll excuse me if the photos are not quite up to standard...


Top right and bottom left: banana walnut cake; 
Top left: unbaked maracon shells; 
Bottom right: completed macaron shells (can't quite remember what I filled it with) 


This was another batch of maracons: plain shells with poppy seeds filled with salted caramel filling. 

Following our impromptu home made pizza experiment, Herr Scherrer & I did continued making more pizzas at home, though with a little more planning:


Monday, 23 August 2010

Earl grey & baileys milk chocolate mousse cake


I realized its been about a month since my last post.  For 2 weeks I was away in Europe on a holiday and upon return work got the better of me for another 2 weeks... It wasn't until this weekend that I finally found some time for therapeutic baking!  

I first made this mousse cake about a year ago when earl grey flavored desserts got very popular in Hong Kong.  This was before I started this blog, hence it was never written about in a post.  I wish I had a shorter and more fanciful name that could adequately describe the perfect blend of earl grey, baileys liquor and chocolate... well, if you have any suggestions feel free to let me know!


There are 3 main parts to this dessert: butter génoise as base, a layer of baileys milk chocolate mousse set over the génoise in the middle, and earl grey mousse (in a dome shape) on the top.  A layer of dark chocolate wrap is added round the mousse cake to finish off, adding both flavor and aesthetics.  It might all sound very time consuming given the many parts to this but each part takes only a short amount of time to complete.  None of the steps are too complicated.  Also, the 2 mousses are set separately and assembled only when both are ready so saving a considerable amount of time. For me, the unforgettable taste of earl grey, baileys and chocolate deliciously harmonized in one single dessert makes it worth it! =P


Recipe below makes 8 individual cakes using 6-cm cake rings & dome molds

Ingredients:
1. For the butter génoise
-  2 eggs
- 40g sugar
- 40g plain flour, sifted
- 20g unsalted butter

2. For the baileys milk chocolate mousse
- 80g milk couverture
- 130g whipping cream
- 20g baileys liquor
- 1 sheet gelatin (2.5g)

3. For the earl grey mousse
- 11g earl grey tea leaves
- 125g fresh milk
- 175g whipping cream
- 50g egg yolks
- 40g sugar
- 2.5 sheets gelatin

Method:
1. For the butter génoise
Preheat over to 180 C.  Hand-whisk eggs and sugar over bain marie till mixture reaches 40 C.  Using an electrical whisk, beat eggs and sugar on high speed till fluffy and peaks form.  Fold flour into egg mixture in 3 batches.  Be careful not to overmix. Melt butter over bain marie, add a scoop of egg & flour mixture and mix well.  Fold mixture back into remaining egg & flour mixture and fold gently till batter surface is uniformly shiny.  Pour into 9-inch round cake tin and bake for 18 mins.  Let cool before cutting into small 5-cm rounds placed at the bottom of lined 6-cm cake rings.

2. For the baileys milk chocolate mousse
Beat whipping cream on medium speed till soft peak forms, set aside.  Soak gelatin sheet in cold water for a few minutes till it blooms.  Melt gelatin sheet over bain marie, then add 1 teaspoon of whipped cream and mix well.  Keep gelatin mixture over bain marie.  Melt milk couverture over bain marie.  When its fully melted, fold in 1/3 whipped cream, then add in gelatin mixture and mix well.  Fold in remaining 2/3 whipped cream into mixture, then gently mix in baileys.  Pour mousse into lined cake rings over butter génoise.  Leave for about 2 hours in refrigerator till set.

3. For the earl grey mousse
Soak gelatin sheets in cold water for a few minutes till it blooms. Prepare earl grey milk by boiling earl grey leaves and milk in a small sauce pan.  Cover sauce pan for 5 minutes after boiling to intensify tea flavor in the milk  Strain leaves and ensure there is 80g of earl grey milk for the mousse. Boil prepared earl grey milk and whipping cream together.  Whisk egg yolk and caster sugar till frothy, then pour in 1/3 of earl grey mixture and mix well.  Pour egg mixture back into remaining 2/3 earl grey mixture and boil, stirring constantly, till mixture thickens slightly.  Add gelatin leaves and mix well.  Pour mousse into 8 pieces of 6-cm dome molds and leave for about 2 hours in refrigerator till set.

4. Assembly
Remove baileys milk chocolate mousse from cake rings (using hot towel or flame torch).  Gently remove earl grey mousse from dome molds (by carefully dipping bottom of molds in hot water, taking care not to allow water into the mousse) and place each dome on top of each baileys milk chocolate mousse layer.  Wrap exterior of individual cakes with dark chocolate, leaving top of dome layer visible.  Top with dark chocolate decoration if desired.


Thursday, 8 April 2010

Pears and strawberries

It seems to me that when one is nursing a wisdom tooth extraction, one tends to crave for something cold, soft and sweet - that was how it was for me at least! Over the long Easter weekend I had my left bottom wisdom tooth taken out via a minor surgery and I've been gobbling down plenty of ice-creams, yogurts, puddings, etc ever since!


My craving for cold, soft and sweet yummies also led me to work on a new mousse cake recipe - creamy pear mousse placed on almond dacquoise base and topped with strawberry jelly layer. The entire ensemble was very light & fruity. I made the dacquoise base and pear mousse the night before so as to allow the mousse to set overnight in the fridge. The strawberry layer was cooled to room temperature before pouring over the pear mousse and allowed to set in the fridge. I've never matched pears with strawberries before so it was interesting to find out it does blend well.


Working on this recipe from scratch meant I had to try it twice before getting the respective quantities right - my initial attempt had the strawberry layer too thick and I felt it masked the taste of the pear mousse, not to mention it also weighed down too heavily on the pear mousse layer which is very light, almost fluffy. The second attempt is what you see here in the photos - the strawberry jelly layer was kept thin hence allowing primary focus (taste buds wise) to be on the pear mousse.


LinkWithin

Related Posts with Thumbnails