Friday 19 February 2010

Bread machines and brioche

I think the best part about making bread at home is the wonderful smell of it baking in the oven and tasting it freshly baked while its still a little warm. We typically have breakfast at home so whenever I have time I enjoy making items like loaves, scones and rolls that we can have for brekkie.


The downside to making your own loaf, as most bakers will agree, is the hard labour of kneading, waiting for the dough to rise and then kneading again... the cycle can continue for 2 or 3 rising till the dough is ready for the oven (though good for working out those arm muscles!!). These days thankfully we can turn to bread machines, which is a wonderful invention, but as I found out for myself, its not completely foolproof and in general churns out loaves that are not as tasty as those made by hand.


I have a very simple and basic bread machine by Moulinex that came as a free gift - other than start-to-bake programs it doesn't handle options for selecting certain specific processes (e.g. it can't do just knead for # minutes), so other than plain white/wheat loaves I haven't really tried using it for anything else. It also churns out loaves that are only 1 shape, tends to be dryer at the side than top due to the positions of the heating elements and has a big hole at the bottom where the kneading pad needs to be. The bread texture is tougher as well and I think it may have to do with the baking stage starting in accordance with a fixed program rather than when the bread has risen enough (the timing of which can differ depending on the type of yeast, flour, the day's humidity, temperature conditions, etc).


After hearing successful stories from other bakers about their experience with bread machines and feeling a little adventurous this week, I decided to give my bread machine another chance and make brioche with it BUT only using the machine for the kneading process. Given my machine doesn't have a selection for "knead only", I had to time it really well and remove the dough from the machine and finish the final knead, shape and rise manually by hand. I allowed the dough to rise for 2 hours (almost double in size) before baking - the bread machine would have only allowed 55 minutes before starting the bake. Lastly, I also baked it using the oven and in a traditional loaf tin (without kneading pad).


I was extremely happy with the result (bread had the right texture and the crust was crisp) and am appreciating my bread machine more now... hehe... (thankfully i didn't throw it out during my house move a few months ago - almost did!). Will definitely want to try out more bread recipes with the machine now that I know how to work around its disadvantages. If anyone's thinking of buying a bread machine, please buy one that has the flexibility of a knead only program coz the fact that mine doesn't still really sucks!


For those who are wondering, brioche is a highly enriched french bread, whose high egg and butter content give it what is seen as a rich and tender crumb. It has a dark, golden, and flaky crust from an egg wash applied before and after proofing.... definition courtesy of wikipedia...

Wednesday 17 February 2010

Aphrodisia dessert buffet

This valentine's day Herr Scherrer gave me a surprise treat at the newly renovated The Mira Hong Kong - a dessert buffet at Yamm starting from 10pm with cakes and desserts from Coco (yes, this man knows me well! haha). I did set up this blog to record home baking escapades, so this would be one unusual exception where I write about commercially made desserts. I also have to apologize for the lack of quality in the photos posted. As it was a surprise I wasn't armed with a proper camera and took the photos with my iphone.

The spread was a bit bigger than what one would generally find at a hotel buffet but not extravagant. In addition to cakes and mousse there were cookies, cupcakes and macaroons. I was surprised & somewhat delighted to find alcohol added to some of the cakes, something unusual in Hong Kong as I was told the locals don't really take to that.


I'm not qualified as a dessert critic so would avoid passing any sort of remarks that would be construed as such. I would just say that as a normal dessert loving consumer, the cakes were a delightful indulgence but not memorable like those from the Mandarin Oriental Cake Shop (if I had to compare). The macaroons were disappointing though (Herr Scherrer's benchmark being those from the swiss Confiserie Sprüngli).


Tuesday 16 February 2010

Mandarin oranges - how sweet thou art

Kung Hey Fat Choi!! Its Chinese New Year once more and this time we're welcoming the year of the tiger! Of the many things I associate closely with CNY, mandarin orange is one that comes to mind easily - sweet and much easier to peel compared to other varieties of orange, its also traditionally seen as a symbol of good fortune and abundance.

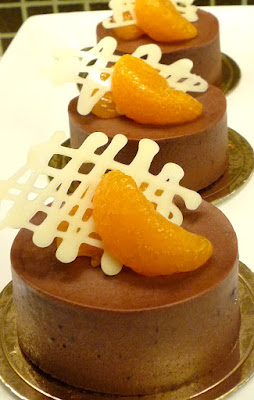
We had invited some friends over to our place for dinner on the second day of CNY and when I started thinking what to make for dessert my mind kept going back to the sweet lingering taste of the mandarin orange I had just finished munching a few minutes ago... it was settled then - I'm going to make use of those mandarin oranges I have lying around the house!


Given that we were having cheese fondue for dinner, I had to bear in mind that dessert couldn't be too heavy and definitely no more cheese! Dark chocolate always goes well with citrus so I decided on a mandarin orange infused dark chocolate mousse, set over soft butter génoise to balance out the rich creamy texture of the mousse.

Making the génoise and mousse was straightforward enough - I modified a baileys milk chocolate mousse recipe I had used previously by switching out the milk chocolate for dark and baileys for orange juice & zest. The resulting chocolate mousse had a distinct citrus taste set against the dark chocolate bitterness.


For decoration I was planning to peel orange segments clean of their inner translucent membranes such that their glaze showed off naturally on top of the mousse. What I didn't plan for though was the segments breaking into pieces as I peeled the membranes off! Nothing I did kept it together so I eventually gave up and used ready-peeled oranges instead... hehe =P I later learned that removing the inner membrane of a mandarin orange while leaving the segment completely intact is quite impossible by hand and usually done through a chemical process... urgh, guess i learnt it the hard way... To finish off, I made zigzag decorative pieces with some white chocolate I had at home, contrasting the white against the orange and chocolate.


Saturday 6 February 2010

Love - hate relationship with ganache

Why? Hmm... Well, for starters you can't get away from loving ganache if you are a chocolate lover like me. It comes in soooo many delicious forms, e.g. left molten to pour as glaze, whipped for use as fillings, piped as decorations and my favourite one - truffles in chocolates! BUT, given its basically a rich emulsified mixture of heavy cream and dark chocolate, its super duper loaded with calories (uhoh!) and somewhat temperamental to manage - too warm and it will likely melt whatever you are adding it to; too cooled and you'll have a difficult time spreading or working it nicely... plus the kitchen top does get all messy with chocolate spills... hehehe

This week I decided my cold war with ganache can take a break as I really wanted to try and mix & match 2 recipes for Devil's Chocolate Cake that I came across. One was in a recipe book by Linda Collister & Anthony Blake that I've had for years, and the other is from Martha Stewart's online recipe site, plus a few modifications of my own. For this cake I had to make 2 batches of ganache - one batch was cooled then whipped and spread as filling over 2 layers of moist chocolate cake. Some golden syrup was added to the second batch and it was poured over the entire cake as glaze.

Not surprising (somehow it always happens...) that my ganache for glazing the cake fell a little short and I had to apply the offset spatula to the side of the cake instead of allowing the ganache to spread and fall smoothly on its own. In addition, I could have done with a bit more and thicker layer of whipped ganache for the filling, but in general i was happy with the end result. It is a little easier to make this cake during the winter days as you could just leave it out on the kitchen top for the ganache to set, instead of having to put it in the fridge and worry about the cake and ganache drying out. Its better not to store the finished cake in the fridge at all so it'll keep moist longer.

What I really love about this cake is the contrast between the semi-bitter chocolate cake and the rich ganache filling and glaze. In addition, its a simple recipe so long as you manage the ganache process well. The next time I do this I'll spray some sparkling gold powder over the top- I did attempt to this time with some loose edible gold powder I happen to have in the kitchen but somehow it didn't spread out well (see pictures below), so i stopped after 2 slices... =P


Recipe below makes one 7 inch round cake

Moist chocolate cake:
85g dark chocolate
110g unsalted butter
85g brown sugar
1 tbls golden syrup
170g cake flour
30g cocoa powder
½ tsp baking powder
2 eggs
6 tbls milk
Put chocolate, butter, sugar and golden syrup in saucepan set over low heat and melt, stirring frequently.  Remove from heat and let cool.  Sift flour, cocoa powder, baking soda together.  Make a well in the centre and pour in cooled melted chocolate mixture.  Stir until well mixed then add eggs, milk and beat gently until the batter is thoroughly combined.  Distribute batter between 2 9-inch cake pans and bake for 20-25 minutes (careful not to overbake as it’ll be dry instead of moist).  Let  cool completely in pans.  Cut out two 7 inch rounds and set aside.  You could also make 8-inch or 9-inch round cakes, just increase the ganache and glaze portions as well so there is enough.

Chocolate ganache:
125g heavy cream
120g semi-sweet chocolate, chopped
Heat cream in a saucepan until it is just about simmering.  Do not boil.  Pour over chocolate.  Leave until completely melted then stir to combine.  Cool to room temperature.  Whisk chocolate mixture until it has lightened slightly, fluffy and spreadable.  Use immediately by spreading evenly over one layer of the chocolate sponge and topping with the other piece of sponge.

Chocolate glaze:
110g heavy cream
105g semi-sweet chocolate, chopped
6g Golden syrup
Pinch of salt
Heat cream in a saucepan until it is just about simmering.  Do not boil.  Pour over chocolate.  Leave until completely melted then stir in golden syrup and salt until combined.  Cool to room temperature and use immediately by pouring over top of cake, allowing it to overflow to fully cover the sides.

Thursday 4 February 2010

My first entry

I've been admiring so many of these food and baking blogs available on the web and wondering when I'll feel confident enough to start one of these myself. So many of them are by extremely experienced and professional bakers - I do feel a little silly setting this blog up, I mean, who would want to read about my failed baking escapades!? Or painful trial and error processes to get a recipe right?

Then one day it hit me - even if no one is interested to read about my baking experience it would still be nice for me to have it documented somewhere - at least i'll be able to read back and learn from my own mistakes... so much about successful baking is remembering what you did right and correcting what you did wrong - constantly... hopefully one day this blog will also be a useful reference for anyone out there who happens to be going though the same learning experience in baking! =P

As a start, a simple slide show below showing photos of what I've been working on the last few months. I guess i'll get round to writing a bit more about some of these bakes when i have time.

LinkWithin

Related Posts with Thumbnails