Showing posts with label bread. Show all posts

Friday, 20 April 2012

Crusty oatmeal bread


I had mentioned in one of my recent posts that we've been consciously incorporating quite a bit of oat into our daily diet, due primarily to my other half's committed effort to lower his cholesterol.  We've had quite a bit of oat-based muffins, pancakes, cookies, and most recently we made oatmeal bread!

This simple oatmeal loaf was so surprisingly good that I knew I had to share it here with all of you the minute I took my first bite.  Health benefits aside, what really surprised me was how crisp the crust turned out while the insides remained soft and moist.  I strongly recommend having this bread fresh out of the oven, once it has cooled slightly but still warm to the touch.  A day later the crust was still lovely but not as crispy as the day before.  Herr Scherrer made some pink salmon sandwiches with it for lunch and it was so yummy we regretted not making a bigger loaf as we ran out of bread!  I intend to try the recipe again soon, replacing a portion of the strong white flour with wholemeal flour.  


Recipe below makes 1 small loaf

Ingredients:
1 tsp dried yeast
175ml water
188g strong white flour
125g oatmeal (I grounded rolled oats in a food processer)
3/4 tsp salt
1/2 tsp honey

Method:
Sprinkle yeast into 50ml of water. Leave for 5 minutes then stir to dissolve. Mix flour, oatmeal and salt in a large bowl. Make a well in the centre and pour in yeast mixture and honey. Pour in remaining water in 2 to 3 batches while gradually mixing in the flour to form a stiff sticky dough. Turn the dough out on a lightly floured surface and knead till smooth and elastic. Put the dough into a clean bowl and cover with towel. Leave to rise until double in size, about 1.5 hours. Knock back, then leave to rest for 10 minutes. Shape dough into a loaf. Place on an oiled baking sheet or loaf tin and cover with towel. Prove until doubled in size, about 1 hour. Brush loaf with water and sprinkle some rolled oats over the top.  Bake in preheated 200 C oven for about 35 minutes until brown and hollow sounding when tapped underneath. Leave to cool on wire rack (out of loaf tin).

Sunday, 18 December 2011

Partybrot

Always looking for an opportunity to make bread at home, this weekend I brought a round loaf of partybrot to a friend's house warming.  It is a delightful item to have on the dinner table and quickly became the centre of attention with its pretty domes topped with sesame and poppy seeds.  


I've posted briefly about this german bread before in April 2010.  This time I leave behind the recipe.  I think this loaf is perfect for the holiday season if you're entertaining guests at home.  I will consider making this again on Saturday for Christmas eve dinner!  and yippe! its 6 days to Christmas!


Recipe below from "Bread" by Eric Treuille and Ursula Ferrigno

2 1/2 tsp dried yeast
250ml milk
60g unsalted butter, melted
2 tbsp granulated sugar
2 eggs, beaten
560g strong white flour
2 tsp salt

Sprinkle yeast into 100ml of milk in a bowl. Leave for 5 minutes; stir to dissolve. 
Warm remaining milk in a saucepan with butter and sugar, stirring till butter has melted. Cool until tepid then beat eggs in till evenly combined.
Mix flour and salt in a large bowl. Make well in centre and pour in yeasted milk and butter mixture. Mix in the flour to form a soft and sticky dough.
Turn dough out on floured work surface. Knead until smooth, shiny and elastic, about 10 minutes.  Dough should be soft and not dry.
Leave dough in buttered bowl and cover with tea towel to rise until double in size, about 1 to 1.5 hours.
Knock back and leave dough to rest for 10 minutes.
Divide into 19 equal pieces and shape each piece into a round smooth ball.
Arrange into greased 9.5 inch round cake tin or spring form pan (I used a slightly smaller cake tin to get higher domes), outer ring of 12 and inner ring of 6, last roll in the centre.
Cover cake tin with tea towel and leave to prove until double in size, about 45 minutes.
Brush top with egg glaze and sprinkle alternately with sesame and poppy seeds.
Bake in preheated 200C oven for 45 minutes until golden and hollow sounding when tapped (I use a convection oven and my bread was done at 30 minutes).
Turn out on wire rack to cool slightly, then wrap in tea towel to keep warm till served.

Friday, 22 April 2011

Impromptu home made pizza

Out of the blue, Herr Scherrer had a sudden inspiration to make our own pizza for dinner last week. I've never attempted preparing pizza dough from scratch so it became an impromptu "experiment".

It was a weekday night after work so we didn't have a lot of time. No time to plan for proper ingredients. It was like a surprise pizza challenge - we had to cope with whatever ingredients we happen to have at home. A quick google search and I found this pizza dough recipe from Jamie Oliver: http://www.jamieoliver.com/recipes/pizza-recipes/pizza-dough, and thankfully I had all the ingredients listed in my kitchen. I threw everything into my trusted bread machine and cut the rising time to 45 minutes as we were getting hungry. =P


While I worked on the dough, Herr Scherrrer planned the pizza toppings - he popped his head into the fridge and dug out mushrooms, tomatoes, spinach. Basically whatever he could find! We had a jar of tomato pasta sauce which we spread on the rolled out dough. We also went with our intuition and added olive oil, herb spices, salt and pepper.

The end result? It was surprisingly yummy for an impromptu pizza put together without much planning. Will definitely try it again with different toppings!

Wednesday, 20 April 2011

Assorted bread rolls


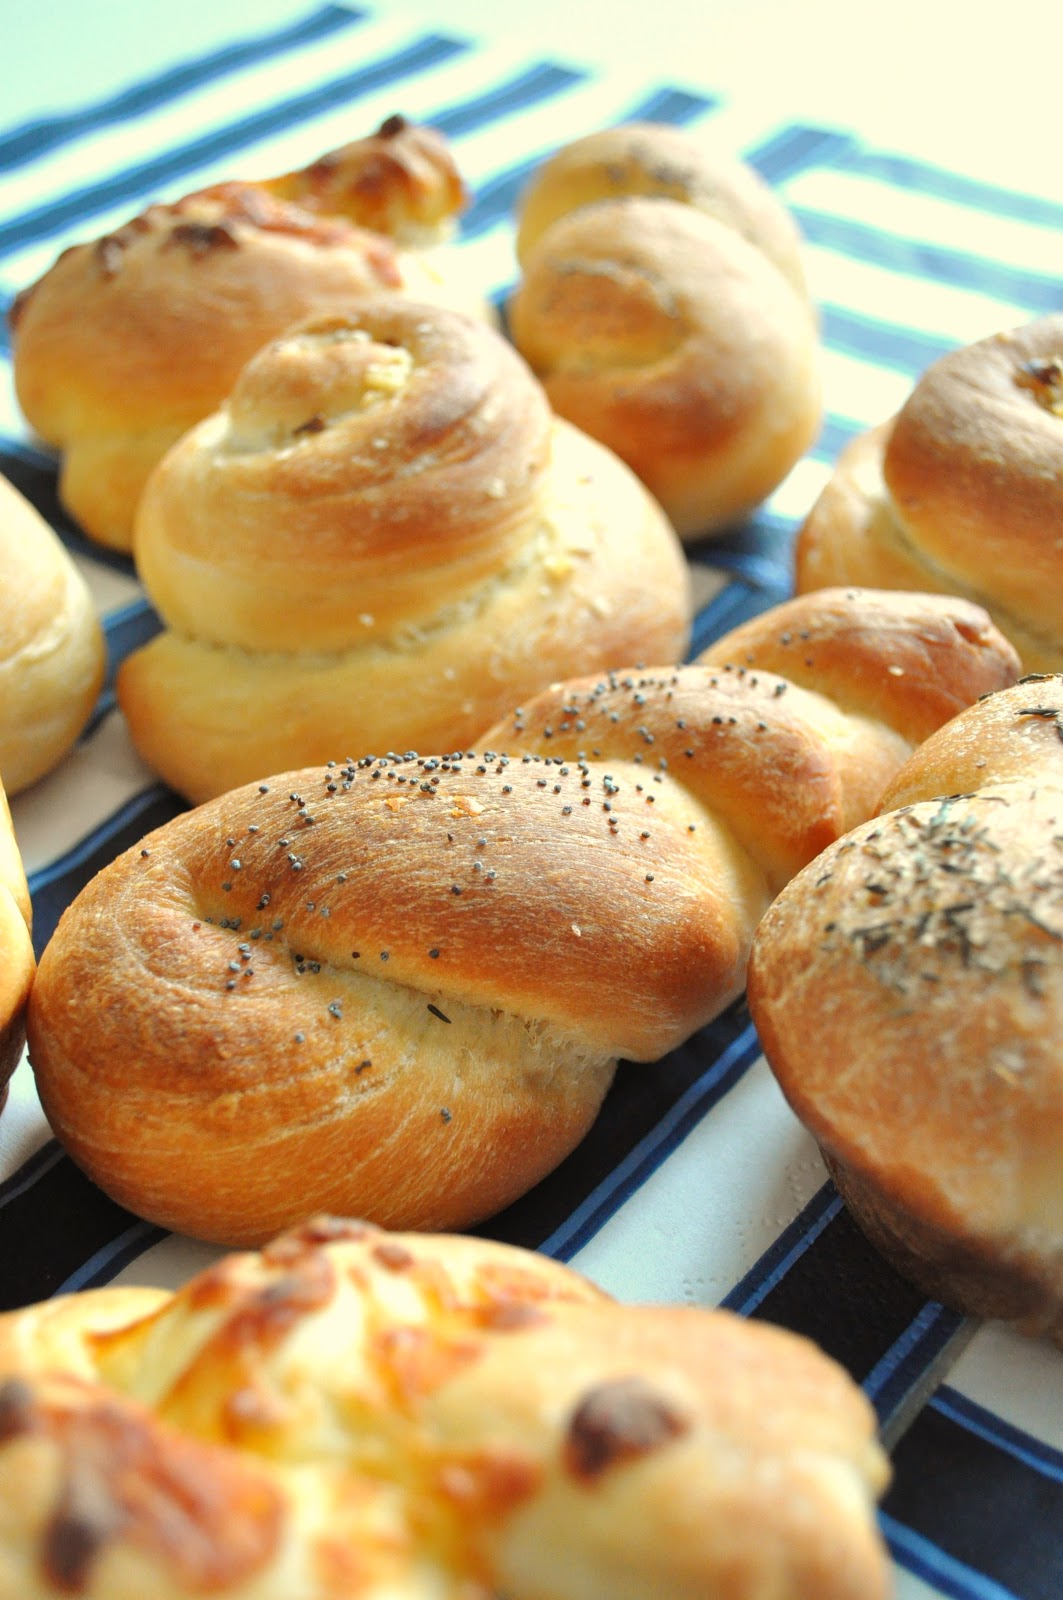
Playing with bread dough is fun fun fun!!  I made an assortment of bread rolls over the weekend.  Before you glance at the pictures and wonder if its a lot of work, let me reassure you that its the same bread dough for all of these dinner bread rolls.

 (In the centre is the twisted roll topped with poppy seeds.)

The real fun starts after the dough has completed its first rise.  After knocking back the risen dough and dividing it into equal pieces of around 60 to 65g each, the individual pieces can be shaped into a variety of assorted rolls.  Once proven, the rolls can be topped with a variety of seeds, nuts, or herbs of choice, including cheese.  There's so much room for creativity!  In the photos posted here you'll see the snail roll topped with crushed walnut, twist roll topped with poppy seeds, knot roll topped with cheese and cloverleaf roll topped with thyme.

 (Snail roll topped with crushed walnuts)

This dough is forgiving and very easy to work with.  It can be prepared using a bread machine, removing after its risen, which makes it very convenient.   In my opinion these are best served warm. 

(Cloverleaf roll topped with thyme)

The following recipe is taken from "Bread" by Eric Treuille and Ursula Ferrigno.

Ingredients:
- 2.5 tsp dried yeast
- 250 ml milk
- 60g unsalted butter, melted
- 30g, melted butter, to glaze and grease bowl and baking sheet
- 2 tbsp granulated sugar
- 2 eggs, beaten
- 560 g strong white flour
- 2 tsp salt

(Knot roll topped with cheese)


Method:
1. Sprinkle yeast into 100ml of the milk in a bowl.  Leave for 5 minutes; stir to dissolve. Warm the remaining milk in a saucepan with the butter and sugar.  Stir continously, until the butter has melted.  Cool until tepid, then beat in the eggs until evenly combined.
2. Mix the flour and salt together in a large bowl. Make a well in the centre and pour in the yeasted milk and the butter mixture.  Mix in the flour to form a soft, sticky dough.
3. Turn the dough out on to a floured work surface.  Knead until smooth, shiny, and elastic, about 10 minutes.  Knead in extra flour, 1 tablespoon at a time, if the dough is too sticky.  Resist adding too much flour - the dough should not be dry, but soft.
4. Put the dough in a buttered bowl and cover with a tea towel.  Leave to rise until doubled in size, 1- 1.5 hours.
5. Knock back, then leave to rest for 10 minutes.  Divide the dough into 16 pieces and shape as follows: 
(a) 4 snail rolls: roll 4 pieces of dough into 30 cm rope each.  Form each rope into a coil, tucking under the end.
(b) 4 baker's knot roll: roll 4 pieces of dough into 30 cm rope each.  Make a loose knot with each rope, leaving enough room for the dough to expand during proving into a tight knot.
(c) 4 cloverleaf roll: separate 4 pieces of dough into 3 even portions each.  Shape each piece into a round roll.  Please 3 balls in each buttered cup of a muffin tin.
(d) 4 twist roll: roll 4 pieces of dough into 30 cm rope each.  Fold each rope in half, and twist; pinch ends to seal.
6. Arrange shaped snail rolls, baker's knot roll and twist roll 5pm apart on buttered baking sheets.  Cover with a tea towel and prove until double in size, about 30 minutes.  Leave cloverleaf roll in muffin tin to prove until double in size, also 30 minutes.
7. Glaze top of the bread rolls with remaining butter, top with nuts, seeds, cheese, spices as you prefer.
8. Bake 15 to 20 minutes in preheated 220 C oven, cool on wire rack.


Tuesday, 7 September 2010

Pumpkin bread


Nope, its not yet thanksgiving but there's always no harm in making some yummylicious pumpkin bread, which is exactly what I did last weekend. This bread has a beautiful golden crumb that somehow reminds me of bright sunny days. I love its slightly sweet taste and soft crust... not to mention its a healthy choice!


Recipe below is adapted from Bread by Eric Treuille & Ursula Ferrigno. It makes a tiny loaf that's just nice for 2 of us at home. You can double the recipe if you prefer a full 500g loaf.

Ingredients:
- 150g pumpkin puree
- 1 tsp dried yeast
- 1 tsp honey
- 250g white bread flour
- 1 tsp salt
- 1/2 tbsp milk for glazing
- nuts or seeds of choice for sprinkling on top

Method:
Sprinkle yeast into 60ml of water. Leave for 5 minutes, add honey and stir to dissolve. Mix flour and salt in a large bowl. Make a well in the centre. Add the yeast mixture followed by pumpkin puree. Gradually mix in the flour to form a fairly firm, coarse, sticky dough. If its too dry, add a few tablespoons of water. Turn the dough out on a lightly floured surface and knead till smooth, silky and elastic, about 10 minutes. Put the dough into a clean bowl and cover with a tea towel. Leave to rise until double in size, about 1.5 hours. Knock back, then leave to rest for 10 minutes. Shape dough into a round loaf. Place on an oiled baking sheet and cover with a tea towel. Prove until doubled in size, about 1 hour. Brush the dough with milk glaze and sprinkle with nuts or seeds of choice. Bake in preheated 220 C oven for 25 to 30 minutes until golden and hollow sounding when tapped underneath. Leave to cool on wire rack.


Saturday, 3 July 2010

Victorian milk bread

I still think nothing beats the wonderful smell of bread baking in the oven!  Still in the habit of making my own bread for breakfast whenever I can, sometimes the type of bread I end up with is dependent on the ingredients I find available in the kitchen.  Last week I realized there were quite a bit of milk in the fridge and decided on the classic victorian milk bread.

Known for its soft crust and crumb, this bread keeps well and remains crisp. The dough is easy to handle hence allowing it to be shaped creatively or even braided if one doesn't want to bake it in a loaf tin.  Most of the time milk loaves don't come with additional toppings but I decided to sprinkle poppy seeds over mine this time. Instead of kneading the dough by hand, I used a bread machine, removed the dough after rising and followed the recipe below from step 5.

Recipe below taken from "Bread" by Eric Treuille & Ursula Ferrigno

Ingredients:
- 2 tsp dried yeast
- 1 tsp granulated sugar
- 350 ml tepid milk
- 500 g strong white flour
- 1.5 tspp salt
- egg glaze, made with 1 egg and tbsp milk

Method:
1. Sprinkle the yeast and sugar into 100 ml of milk in a bowl. Leave for 5 minutes; stir to dissolve. Stir in half of the remaining milk.
2. Mix the flour and salt together in a large bowl. Make a well in the centre and pour in the yeasted milk. Mix in the flour. Stir in the reserved milk to form a sticky dough.
3. Turn the dough out on a lightly floured work surface. Knead the dough until smooth and elastic, about 10 minutes.
4. Put the dough in a clean bowl and cover with a tea towel. Leave to rise for 45 minutes.
5. Knock back, cover, and leave the dough to rise again until doubled in size, about 45 minutes. Grease a 500g loaf tin. Shape the dough into a S-shape to fit in a loaf tin. Cover with a tea towel, then prove until the dough is 2.5cm above the top of the tin, about 1 hour.
6. Brush the top of the loaf with the egg glaze. Bake in 200 C preheated oven  for 45 minutes until golden and hollow-sounding when tapped underneath. Turn out on to a wire rack and leave to cool.

Monday, 10 May 2010

Rosemary & raisins

I love the subtle smell of herbs when munching into a piece of bread.  Last week, I was happy to work on a loaf called pane di ramerino or simply rosemary raisin bread.  Pane di ramerino, as the name suggests, is an Italian bread. Enriched with eggs, milk and olive oil, its believed to be of Tuscan origin made since the 16th century.  


Instead of using fresh rosemary and raisins as I did, the recipe also provided an alternative: using almonds in place of rosemary, dried figs in place of raisins and orange juice in place of olive oil - you'll get Pane ai fichi con mandorle or Fig bread with almonds instead.

Friday, 23 April 2010

Nuts... Noix...

Still on my bread making spree, a few days ago I tried another recipe from the new bread recipe book mentioned in my last post.

Pain aux noix is a french bread. Its typically made with a mix of white and wholegrain flour resulting in a fairly complex texture and flavor. Coarsely chopped walnuts are added to the dough at the end of kneading, hence the name, which literally means "nut bread".


The recipe in the book calls for walnuts but I had half an open pack of pecans so decided to give my pain aux noix a little twist by using pecans instead of walnuts... I'm not sure why walnuts are usually used - perhaps its more flavorful? I'm making a mental note to try it again with walnuts.

Three types of flour - white, wholegrain, rye - was used in this recipe, which I think contributed to a deep flavor in the loaf. The bread goes really well with cheese. I personally found the texture a little heavy than expected, not too sure if it was due to insufficient rising or just the combination of wholewheat and rye flour in the recipe... will try the recipe again soon to find out!

Sunday, 18 April 2010

Partying with bread

Recently I've been pampering (or maybe torturing? Hehehe...) Herr Scherrer with quite a bit of home-made bread for brekkie. Running out of interesting bread recipes to try, I recently purchased a new recipe book by Eric Treuille and Ursula Ferrigno which had all 168 pages focused solely on bread - there must be about 100 different bread recipes in it! Yeeaah!

The first bread recipe that caught my eye was one for "partybrot" or simply "party bread" in English. Partybrot is a German bread made by baking individual dinner rolls together in a round cake tin. The rounds are then sprinkled with sesame or poppy seeds. I love how cute it looks - little rounded blobs stuck together. Its really pretty to have on the table, especially when you have guests over for dinner.


The recipe in the book suggested sprinkling alternate blobs with sesame and poppy seeds so there'll be a nice colour contrast but too bad I only had poppy seeds at home.

Saturday, 10 April 2010

Scones - one of those all time favorites

My friend Jackie successfully made her first pandan chiffon cake last week using the recipe I posted here. It was very nice of her to share her experience with me! Seemingly on a baking spree, she sent me a text 2 days ago asking for a scone recipe. I'm usually very lazy about typing out recipes but since I have to do it in order to email the recipe to her, I thought I might as well post it up for anyone else that might be interested, along with my 5 cents worth of tips. =P

Scones are probably one of the least time consuming items to make when it comes to baking, yet it is often said that the ability to bake light, flaky, golden scones has long been considered the test of a real baker. I don't know about that... but I do know that baking a successful batch of scones can be easy once you take note of certain essential key points. I figured some of these out the hard way (= lots of failed, trial & error attempts) since many recipe books don't spell it out that specifically for you.

1. Cut butter into small pieces before adding it into the flour.
2. Butter should be cold while its being worked into the flour.
3. Do not over handle the dough. This is probably the most important point of all! I usually mix in the wet ingredients with a spatula (no hands) until a soft dough forms. Remember to stop mixing once the ingredients come together - under mix is often enough. Over handling will result in rock hard scones.
4. Depending on humidity conditions, flour absorbs different amounts of liquid. Freshness of the flour is also a factor. If you find your dough too sticky and difficult to roll into required shape, just add more flour. Conversely, if your dough is too dry, add more water.

There are tons of scone recipes out there, many yummy variations with milk, buttercream, yogurt, etc, plus all sorts of possible flavorings (raisins, nuts, seeds, fruits, etc) but here's a fairly simple one that I use often with sultanas (Recipe from periplus mini cookbooks, slightly adapted. Photo was taken sometime back - I used raisins instead of sultanas on that occasion.):

Ingredients:
2 cups self-raising flour
30 g butter
1/3 cup caster sugar
1/4 cup sultanas
1 egg, lightly beaten
150 ml milk

Method:
1. Preheat oven to 220 degree celsius.
2. Sift flour into a large bowl, add butter and rub in lightly with fingertips till mixture resembles fine bread crumbs.
3. Mix in sugar and sultanas.
4. Combine egg and milk.
5. Make a well in the centre of the flour, pour in egg & milk mixture all at once, reserving about 1 teaspoon for glazing. Mix quickly to a soft dough.
6. Turn onto a floured board (use self-raising flour). Knead lightly. Press or roll out to form a round about 2 cm thick.
7. Cut using a floured plain round cutter or cut into triangles using a floured knife.
8. Place on greased oven tray and glaze with milk mixture (from step 4).
9. Bake for 10-12 minutes in preheated oven.
10. Cool on wire rack.

Monday, 15 March 2010

Craving for Zopf? You'll have to wait till Sunday!

I absolutely love bread... so whenever I'm in Switzerland, its like I'm in bread heaven!! According to swissworld.org, there are possibly 200 to 300 varieties of bread in Switzerland, each canton has its own traditional loaf, and there are all sorts of special loaves for special days and occasions.


My favorite pick is the Zopf, a braided loaf that is only available on Sundays in Switzerland. Made traditionally with a high proportion of butter and fresh milk, Zopf is braided in distinct signature style - either the 2 or 4 strands method, not 3. The braided dough is typically brushed with egg yolk before baking to give it a dark brown crust.

Suffering from swiss bread withdrawal symptoms since my trip a few weeks back, I gave the Zopf recipe I had a try on Sunday. Preparing the dough itself was simple and straightforward. Braiding the dough was a little tricky and I definitely need more practice on that. Would advise anyone who is trying the Zopf that the 2 strand method is easier than the 4 strand method (in my humble opinion). I did however leave my loaf in the oven for a couple of minutes too long hence resulting in a darker crust than I would prefer - thankfully it didn't affect the taste of the bread!! Yummy!!


Friday, 19 February 2010

Bread machines and brioche

I think the best part about making bread at home is the wonderful smell of it baking in the oven and tasting it freshly baked while its still a little warm. We typically have breakfast at home so whenever I have time I enjoy making items like loaves, scones and rolls that we can have for brekkie.


The downside to making your own loaf, as most bakers will agree, is the hard labour of kneading, waiting for the dough to rise and then kneading again... the cycle can continue for 2 or 3 rising till the dough is ready for the oven (though good for working out those arm muscles!!). These days thankfully we can turn to bread machines, which is a wonderful invention, but as I found out for myself, its not completely foolproof and in general churns out loaves that are not as tasty as those made by hand.


I have a very simple and basic bread machine by Moulinex that came as a free gift - other than start-to-bake programs it doesn't handle options for selecting certain specific processes (e.g. it can't do just knead for # minutes), so other than plain white/wheat loaves I haven't really tried using it for anything else. It also churns out loaves that are only 1 shape, tends to be dryer at the side than top due to the positions of the heating elements and has a big hole at the bottom where the kneading pad needs to be. The bread texture is tougher as well and I think it may have to do with the baking stage starting in accordance with a fixed program rather than when the bread has risen enough (the timing of which can differ depending on the type of yeast, flour, the day's humidity, temperature conditions, etc).


After hearing successful stories from other bakers about their experience with bread machines and feeling a little adventurous this week, I decided to give my bread machine another chance and make brioche with it BUT only using the machine for the kneading process. Given my machine doesn't have a selection for "knead only", I had to time it really well and remove the dough from the machine and finish the final knead, shape and rise manually by hand. I allowed the dough to rise for 2 hours (almost double in size) before baking - the bread machine would have only allowed 55 minutes before starting the bake. Lastly, I also baked it using the oven and in a traditional loaf tin (without kneading pad).


I was extremely happy with the result (bread had the right texture and the crust was crisp) and am appreciating my bread machine more now... hehe... (thankfully i didn't throw it out during my house move a few months ago - almost did!). Will definitely want to try out more bread recipes with the machine now that I know how to work around its disadvantages. If anyone's thinking of buying a bread machine, please buy one that has the flexibility of a knead only program coz the fact that mine doesn't still really sucks!


For those who are wondering, brioche is a highly enriched french bread, whose high egg and butter content give it what is seen as a rich and tender crumb. It has a dark, golden, and flaky crust from an egg wash applied before and after proofing.... definition courtesy of wikipedia...

LinkWithin

Related Posts with Thumbnails