Showing posts with label chocolate. Show all posts

Friday, 6 April 2012

Pistachio & raspberry macarons (PH's Montebello)


I guess it's about time for another try of Pierre Hermé's macaron recipes. =D  This time, I really wanted to try one with a jelly insert.  The Montebello macaron caught my eye for its contrasting colours and the pairing of pistachios and raspberry flavors sounded so intriguing.


I was initially a little hesitant about the recipe after realizing how much colouring I had to add for the red shells - 11g worth compared to 3g for the green shells! I've never used up so much colouring on a single batch of macarons much less for half a batch.  Then I thought - its PH so I just need to trust it.  On hindsight I had nothing to worry about coz the red shells couldn't have turned out any better! 

The tanginess of the raspberry jelly really adds a lovely twist to the pistachio ganache.  Who would have thought pistachios and raspberry could pair so well?


There was a little hiccup was when I tried sprinkling some crushed pistachios on some of the green shells.  For some reason the ones with sprinkled crushed pistachios all had cracked tops whilst those without were fine, yet they all came from the same batch of batter.  Strange?

Have a good Easter everyone!

Recipe below makes about 72 macarons, adapted from Pierre Hermé's "Macarons"

Raspberry jelly:
300g fresh raspberries
60g caster sugar
2 pcs gelatin leaves

Soak gelatin leaves in cold water.  Puree raspberries and sugar together, then strain to remove pips.  Heat puree to about 45C and add gelatin leaves, stiring to incorporate.  Pour into gratin dish lined with clingflim to a depth of about 4mm.  Leave to cool 1 hr in room temperature then in freezer for 2 hours. Cut jelly into 1.5cm squares and return to freezer while working on the rest of the macarons.

Macaron shells:
Green shells:
150g ground almonds
150g icing sugar
55g aged egg whites
1g yellow food colouring
2g green food colouring

Red shells:
150g ground almonds
150g icing sugar
55g aged egg whites
11g raspberry red food colouring

Italian meringue:
- 300g caster sugar
- 76g mineral water
- 110g aged egg whites
- 1.5 tsp egg white powder (added to second portion of egg whites.  PH doesn't use egg white powder in his recipes in the book but he recommends using egg whites that have been aged for at least a few days.  I tend to add egg white powder to my egg whites if I didn't have the chance to age them enough.  It helps to strengthen the protein bonds that form when you whisk the whites and gives the same effect as using aged egg whites.)

For the shells, sift together icing sugar & ground almonds in a large bowl. Stir respective food colouring into egg whites, then pour mixture into icing sugar & ground almonds but do not stir.
To make italian meringue, bring water & caster sugar to boil at 118C.  At 115C, start whisking second portion of egg whites (with egg white powder, if applicable).  When sugar syrup reaches 118C, pour it over egg whites, whisking continuously till meringue to cools to 50C.  Separate meringue into 2 equal batches and fold each batch separately into red and green/yellow ground almond-icing sugar mixture.  Spoon each batch of batter into separate piping bag fitted with plain nozzle.
Pipe rounds of batter about 3.5cm in diameter, spacing them 2cm apart on lined baking trays.  Rap baking trays on work surface covered with kitchen cloth. 

PH's instructions are to leave shells to stand for at least 30 minutes until they form a skin, then bake them in fan oven for 12 minutes at 180C.  From past experience this doesn't always work for me under Hong Kong's weather conditions, so instead I dry the piped batter for 15 minutes in the oven at 65C, then without removing the macarons, increase the temperature to 150C and bake for 14 to 15 minutes.  Either way, during the last 4 minutes of baking open and close the oven door twice to let out steam.  Once out of the oven, slide shells on to cooling rack and allow to cool completely before removing from silicon mat / parchment.

Pistachio ganache:
225g whipping cream
225g white chocolate
35g pistachios

Blend pistachios with whipping cream in electric food processer.  Melt chocolate.  Bring cream & pistachios to boil and pour it over the chocolate in batches.  Stir till smooth. Pour ganache into gratin dish and press clingfilm over the surface of ganache.  Set aside in fridge for ganache to thicken.

Assembly: 
Spoon ganache into piping bag fitted with plain nozzle.  Pipe a generous mould on either the red or green shells and lightly press a cube of raspberry jelly into the centre.  Pipe a dot of ganache on top then cover with another shell of different colour.  Store macarons for 24 hours in fridge and bring out 2 hours before serving.

Friday, 2 March 2012

Passion fruit & milk chocolate macarons

Ever since I tried a raspberry chocolate macaron from Jean-Paul Hévin a couple of weeks ago (they have outlets in HK), I've been reminising the complimentary taste of chocolate with tanginess of the raspberry.  It reminded me a lot of Pierre Hermé's Mogador macarons, which as most of you know is a mix of milk chocolate and passion fruit hence having some similarity in terms of taste from the blend of chocolate with tangy fruit.

Now that I've gotten my own copy of PH's Macarons book, I thought its time I tried recreating these Mogador macarons.  Its probably one of the easier recipes in the book when it comes to sourcing for ingredients.  Passion fruits are much much easier to find compared to exotic stuff like Tuber Melanosporum black truffles or Aceto Balsamico Di Modena, listed as ingredients for some of the more unusual macarons...What can i say, its PH afterall...


I had a little problem with the food colouring though - if you've already noticed from the pictures, my macarons turned out a little more orange than yellow.  I guess I might have over did it a little on the red food colouring =P.  Still, its such a joy churning out bright coloured macarons, just looking at them makes me happy!  And they taste sooo yummy too! 


Recipe below makes about 36 macarons, adapted from Pierre Hermé's "Macarons"

Macaron shells:
150g ground almonds
150g icing sugar
55g aged egg whites (first portion)

approximately 2.5g yellow food colouring
approximately 1/4 tsp red food colouring (adjust this according to how strong the food colouring you're using is, or you could get orange instead of yellow macarons like me!)

For the italian meringue:
- 150g caster sugar
- 37.5g mineral water
- 55g aged egg whites (second portion)
- 1.5 tsp egg white powder (added to second portion of egg whites.  PH doesn't use egg white powder in his recipes in the book but he recommends using egg whites that have been aged for at least a few days.  I tend to add egg white powder to my egg whites if I didn't have the chance to age them enough.  It helps to strengthen the protein bonds that form when you whisk the whites and gives the same effect as using aged egg whites.)

Finish: cocoa powder

Sift together icing sugar & ground almonds in a large bowl. Stir food colouring into first portion of egg whites, then pour mixture into icing sugar & ground almonds but do not stir.
To make italian meringue, bring water & caster sugar to boil at 118C.  At 115C, start whisking second portion of egg whites (with egg white powder).  When sugar syrup reaches 118C, pour it over egg whites, whisking continuously till meringue to cools to 50C, then fold into ground almond-icing sugar mixture.  Spoon batter into piping bag fitted with plain nozzle.
Pipe rounds of batter about 3.5cm in diameter, spacing them 2cm apart on lined baking trays.  Rap baking trays on work surface covered with kitchen cloth.  Using a sieve, sprinkle cocoa powder lightly over shells.  

PH's instructions are to leave shells to stand for at least 30 minutes until they form a skin, then bake them in fan oven for 12 minutes at 180C.  From past experience this doesn't always work for me under Hong Kong's weather conditions, so instead I dry the piped batter for 15 minutes in the oven at 65C, then without removing the macarons, increase the temperature to 150C and bake for 14 minutes.  Either way, during the last 4 minutes of baking open and close the oven door twice to let out steam.  Once out of the oven, slide shells on to cooling rack and allow to cool completely before removing from silicon mat / parchment.

Passion fruit & milk chocolate ganache:
50g "La Viette" butter (or your preferred unsalted butter), at room temperature
275g Valrhona Jivara chocolate or milk chocolate, 40% cocoa solids
125g passion fruit juice

Cut butter into pieces and chop up chocolate.  Halve passion fruits and scoop seeds out with a spoon.  Strain to obtain juice.  Bring juice to boil.
Partially melt chopped chocolate bain marie.  Pour hot juice over chocolate a third at a time.
When temperature reaches 60C, add pieces of butter a few at a time.  Stir to obtain a smooth ganache.  
Pour ganache into gratin dish and press clingfilm over the surface of ganache.  Set aside in fridge for ganache to thicken.

Assembly: 
Spoon ganache into piping bag fitted with plain nozzle.  Pipe a generous mould on half of the shells and top with remaining half.  Store macarons for 24 hours in fridge and bring out 2 hours before serving.


Tuesday, 8 November 2011

It's time for cookies!


 "I love cookies warm!"  exclaimed Herr Scherrer as he excitedly grabs a cookie from the cooling rack.  He never fails to remind me of that when I make cookies at home and I agree with him wholeheartedly.  Cookies are best when they've cooled slightly but not completely.  I wish we could just pop the cookies into a microwave and get the same effect but its just never the same after its completely cooled. 


I was reminded of this again a couple of weekends ago when I made these dark chocolate walnut cookies.  The original recipe called for white chocolates with macadamia but I had none of those available at home.  We were stuck at home for a couple of hours while waiting for the cable company to upgrade our broadband speed - just enough time, though unexpected, for a quick batch of cookies.  We also have super fast internet speed now reaching several hundred mbps .  Thrilling!


Recipe adapted from Australian Women's Weekly's "Biscuits & Slices", makes about 30 cookies.

125g butter, chopped
1 teaspoon vanilla essence
1 teaspoon grated orange rind
200g firmly packed brown sugar
1 egg
225g plain flour
190g dark chocolate bits
50g finely chopped walnuts

Beat butter, essence, rind, sugar and egg in small bowl with electric mixer until smooth.  Stir in flour and chocolate bits.  Drop level tablespoons of mixture about 5cm apart onto greased oven trays, top with nuts.  Baked cookies in 180 C preheated oven about 15 minutes or until firm.  Cool on wire racks.


Sunday, 30 January 2011

Black forest verrines

The past month was full of activity!  First I had my move to Discovery Bay right before Christmas, then it was Christmas and New Year celebrations... in mid January a major deal at work finally closed (something I've been working on for months so that was a huge relief).  I also managed to squeeze in a snowboarding trip to Niseko (plenty of amazing fresh powder everyday!)... And in a blink Chinese New Year is now almost here!

 
With plenty going on, I've not had the chance to spend much time in my new kitchen which is strange given it was really the kitchen that sold the apartment.  Its an open kitchen which gives me much more working space compared to my previous one - great for all sorts of baking and cooking projects!  This weekend I made up for my absence in the kitchen by working on something that's been swirling around in my head for some time - Black forest verrines.


The black forest cake is such a traditional favorite that I thought it might be fun to give it a not-so-traditional twist.  I laid the chocolate gateau, chocolate mousse, dark cherries and cream mousse layers down in a small cup rather than building it up as a full cake.  Pre-soaking the dark cherries in rum gives this dessert a real oomph! 


Recipe below makes 10 verrines

Chocolate gateau layer:
- 3 eggs
- 60g sugar
- 55g plain flour
- 10g cocoa powder
- 30g melted butter
Chocolate mousse layer:
- 80g dark couverture
- 130g whipping cream
Dark cherries layer:
- 20 pitted dark cherries (from a can)
- 25g rum
Cream mousse layer:
- 15g sugar
- 170g whipping cream

Soak cherries in rum. 
Line a square cake tin that is around 7 by 7 inch.  Sieve plain flour and cocoa powder together and set aside. Hand whisk eggs and sugar over bain marie till it reaches 40C.  Using an electric whisk, beat till egg mixture becomes light and frothy.  Fold in flour and cocoa powder mixture.  Fold melted butter into mixture.  Bake in preheated 170C oven for 25 to 30 minutes.  When cooled, cut cake into 2 layers and into small pieces that would fit into cups used for the verrines. Each verrine would need 3 layers of chocolate gateau.
Whisk 130g of whipping cream till soft peaks forms.  Melt dark couverture over bain marie before folding into whipped cream until an even mousse forms.
Whisk remaining whipping cream with 15g sugar till soft peak forms.

To assemble the verrines, place 1 layer of chocolate gateau at the bottom of a small glass cup.  Top with a layer of chocolate mousse followed by a 2nd layer of chocolate gateau.  Place 2 dark cherries into each cup on top of the 2nd chocolate gateau layer and distribute any remaining rum mixture among all cups, allowing it to soak into the 2nd chocolate gateau layer.  Fill in the spaces between the cherries with cream mousse, followed by a 3rd chocolate gateau layer.  Top the cups with remaining cream mousse.  Sprinkle some cocoa powder over top of each verrine.  Once the cream mousse has firmed up in the fridge, a cherry (or other fruits) may be added on top as desired.


Monday, 23 August 2010

Earl grey & baileys milk chocolate mousse cake


I realized its been about a month since my last post.  For 2 weeks I was away in Europe on a holiday and upon return work got the better of me for another 2 weeks... It wasn't until this weekend that I finally found some time for therapeutic baking!  

I first made this mousse cake about a year ago when earl grey flavored desserts got very popular in Hong Kong.  This was before I started this blog, hence it was never written about in a post.  I wish I had a shorter and more fanciful name that could adequately describe the perfect blend of earl grey, baileys liquor and chocolate... well, if you have any suggestions feel free to let me know!


There are 3 main parts to this dessert: butter génoise as base, a layer of baileys milk chocolate mousse set over the génoise in the middle, and earl grey mousse (in a dome shape) on the top.  A layer of dark chocolate wrap is added round the mousse cake to finish off, adding both flavor and aesthetics.  It might all sound very time consuming given the many parts to this but each part takes only a short amount of time to complete.  None of the steps are too complicated.  Also, the 2 mousses are set separately and assembled only when both are ready so saving a considerable amount of time. For me, the unforgettable taste of earl grey, baileys and chocolate deliciously harmonized in one single dessert makes it worth it! =P


Recipe below makes 8 individual cakes using 6-cm cake rings & dome molds

Ingredients:
1. For the butter génoise
-  2 eggs
- 40g sugar
- 40g plain flour, sifted
- 20g unsalted butter

2. For the baileys milk chocolate mousse
- 80g milk couverture
- 130g whipping cream
- 20g baileys liquor
- 1 sheet gelatin (2.5g)

3. For the earl grey mousse
- 11g earl grey tea leaves
- 125g fresh milk
- 175g whipping cream
- 50g egg yolks
- 40g sugar
- 2.5 sheets gelatin

Method:
1. For the butter génoise
Preheat over to 180 C.  Hand-whisk eggs and sugar over bain marie till mixture reaches 40 C.  Using an electrical whisk, beat eggs and sugar on high speed till fluffy and peaks form.  Fold flour into egg mixture in 3 batches.  Be careful not to overmix. Melt butter over bain marie, add a scoop of egg & flour mixture and mix well.  Fold mixture back into remaining egg & flour mixture and fold gently till batter surface is uniformly shiny.  Pour into 9-inch round cake tin and bake for 18 mins.  Let cool before cutting into small 5-cm rounds placed at the bottom of lined 6-cm cake rings.

2. For the baileys milk chocolate mousse
Beat whipping cream on medium speed till soft peak forms, set aside.  Soak gelatin sheet in cold water for a few minutes till it blooms.  Melt gelatin sheet over bain marie, then add 1 teaspoon of whipped cream and mix well.  Keep gelatin mixture over bain marie.  Melt milk couverture over bain marie.  When its fully melted, fold in 1/3 whipped cream, then add in gelatin mixture and mix well.  Fold in remaining 2/3 whipped cream into mixture, then gently mix in baileys.  Pour mousse into lined cake rings over butter génoise.  Leave for about 2 hours in refrigerator till set.

3. For the earl grey mousse
Soak gelatin sheets in cold water for a few minutes till it blooms. Prepare earl grey milk by boiling earl grey leaves and milk in a small sauce pan.  Cover sauce pan for 5 minutes after boiling to intensify tea flavor in the milk  Strain leaves and ensure there is 80g of earl grey milk for the mousse. Boil prepared earl grey milk and whipping cream together.  Whisk egg yolk and caster sugar till frothy, then pour in 1/3 of earl grey mixture and mix well.  Pour egg mixture back into remaining 2/3 earl grey mixture and boil, stirring constantly, till mixture thickens slightly.  Add gelatin leaves and mix well.  Pour mousse into 8 pieces of 6-cm dome molds and leave for about 2 hours in refrigerator till set.

4. Assembly
Remove baileys milk chocolate mousse from cake rings (using hot towel or flame torch).  Gently remove earl grey mousse from dome molds (by carefully dipping bottom of molds in hot water, taking care not to allow water into the mousse) and place each dome on top of each baileys milk chocolate mousse layer.  Wrap exterior of individual cakes with dark chocolate, leaving top of dome layer visible.  Top with dark chocolate decoration if desired.


Monday, 12 July 2010

Oooh those buttery sablés


You can't tell from the photos but I went sablé cookies crazy this weekend! I made at least 100 of these buttery yummies, enough to fill 2 large cookie jars! I love the taste of rich buttery cookies and sablés are one of my favorites. As always, with biscuits and cookies its always easier to make a big batch of dough at one go and freeze part of it if you don't wish to bake it all at once.


A french cookie originating from Normandy, sablés are crisp yet delicate and crumble nicely in your mouth. A french chef once told me I should never to refer to sablés as cookies... hehe.... anyhow, pair it with a good cup of coffee and you pretty much get my idea of a lovely afternoon tea.


These dainty bites come in all sorts of fancy designs, e.g. swirls and checkers. I was a little lazy with mine and went with four chocolate and vanilla quadrants placed alternate to each other.

Tuesday, 16 February 2010

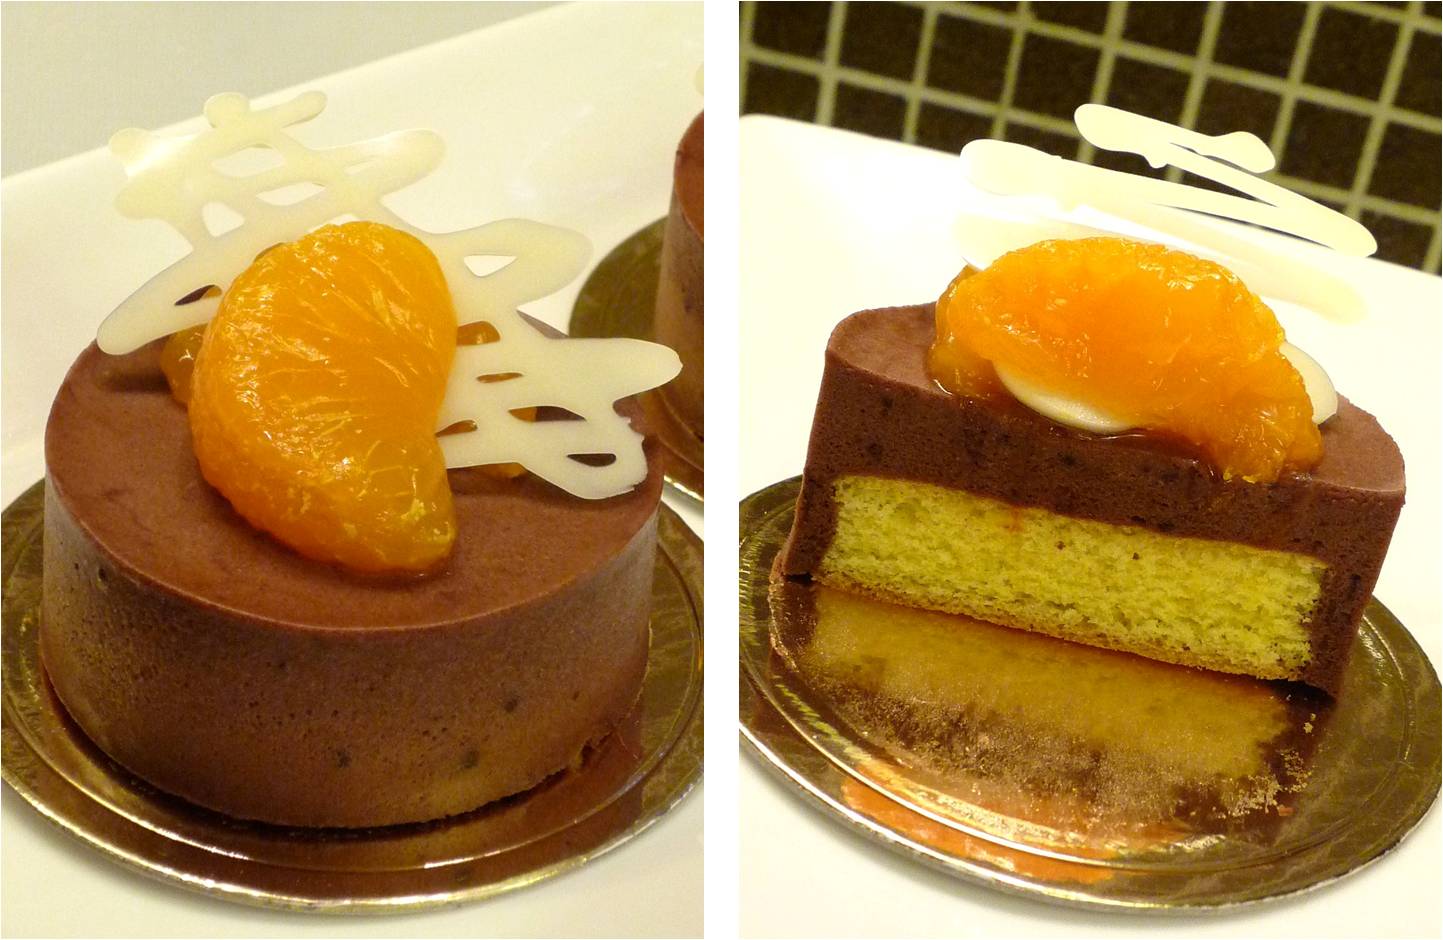
Mandarin oranges - how sweet thou art

Kung Hey Fat Choi!! Its Chinese New Year once more and this time we're welcoming the year of the tiger! Of the many things I associate closely with CNY, mandarin orange is one that comes to mind easily - sweet and much easier to peel compared to other varieties of orange, its also traditionally seen as a symbol of good fortune and abundance.

We had invited some friends over to our place for dinner on the second day of CNY and when I started thinking what to make for dessert my mind kept going back to the sweet lingering taste of the mandarin orange I had just finished munching a few minutes ago... it was settled then - I'm going to make use of those mandarin oranges I have lying around the house!


Given that we were having cheese fondue for dinner, I had to bear in mind that dessert couldn't be too heavy and definitely no more cheese! Dark chocolate always goes well with citrus so I decided on a mandarin orange infused dark chocolate mousse, set over soft butter génoise to balance out the rich creamy texture of the mousse.

Making the génoise and mousse was straightforward enough - I modified a baileys milk chocolate mousse recipe I had used previously by switching out the milk chocolate for dark and baileys for orange juice & zest. The resulting chocolate mousse had a distinct citrus taste set against the dark chocolate bitterness.


For decoration I was planning to peel orange segments clean of their inner translucent membranes such that their glaze showed off naturally on top of the mousse. What I didn't plan for though was the segments breaking into pieces as I peeled the membranes off! Nothing I did kept it together so I eventually gave up and used ready-peeled oranges instead... hehe =P I later learned that removing the inner membrane of a mandarin orange while leaving the segment completely intact is quite impossible by hand and usually done through a chemical process... urgh, guess i learnt it the hard way... To finish off, I made zigzag decorative pieces with some white chocolate I had at home, contrasting the white against the orange and chocolate.


Saturday, 6 February 2010

Love - hate relationship with ganache

Why? Hmm... Well, for starters you can't get away from loving ganache if you are a chocolate lover like me. It comes in soooo many delicious forms, e.g. left molten to pour as glaze, whipped for use as fillings, piped as decorations and my favourite one - truffles in chocolates! BUT, given its basically a rich emulsified mixture of heavy cream and dark chocolate, its super duper loaded with calories (uhoh!) and somewhat temperamental to manage - too warm and it will likely melt whatever you are adding it to; too cooled and you'll have a difficult time spreading or working it nicely... plus the kitchen top does get all messy with chocolate spills... hehehe

This week I decided my cold war with ganache can take a break as I really wanted to try and mix & match 2 recipes for Devil's Chocolate Cake that I came across. One was in a recipe book by Linda Collister & Anthony Blake that I've had for years, and the other is from Martha Stewart's online recipe site, plus a few modifications of my own. For this cake I had to make 2 batches of ganache - one batch was cooled then whipped and spread as filling over 2 layers of moist chocolate cake. Some golden syrup was added to the second batch and it was poured over the entire cake as glaze.

Not surprising (somehow it always happens...) that my ganache for glazing the cake fell a little short and I had to apply the offset spatula to the side of the cake instead of allowing the ganache to spread and fall smoothly on its own. In addition, I could have done with a bit more and thicker layer of whipped ganache for the filling, but in general i was happy with the end result. It is a little easier to make this cake during the winter days as you could just leave it out on the kitchen top for the ganache to set, instead of having to put it in the fridge and worry about the cake and ganache drying out. Its better not to store the finished cake in the fridge at all so it'll keep moist longer.

What I really love about this cake is the contrast between the semi-bitter chocolate cake and the rich ganache filling and glaze. In addition, its a simple recipe so long as you manage the ganache process well. The next time I do this I'll spray some sparkling gold powder over the top- I did attempt to this time with some loose edible gold powder I happen to have in the kitchen but somehow it didn't spread out well (see pictures below), so i stopped after 2 slices... =P


Recipe below makes one 7 inch round cake

Moist chocolate cake:
85g dark chocolate
110g unsalted butter
85g brown sugar
1 tbls golden syrup
170g cake flour
30g cocoa powder
½ tsp baking powder
2 eggs
6 tbls milk
Put chocolate, butter, sugar and golden syrup in saucepan set over low heat and melt, stirring frequently.  Remove from heat and let cool.  Sift flour, cocoa powder, baking soda together.  Make a well in the centre and pour in cooled melted chocolate mixture.  Stir until well mixed then add eggs, milk and beat gently until the batter is thoroughly combined.  Distribute batter between 2 9-inch cake pans and bake for 20-25 minutes (careful not to overbake as it’ll be dry instead of moist).  Let  cool completely in pans.  Cut out two 7 inch rounds and set aside.  You could also make 8-inch or 9-inch round cakes, just increase the ganache and glaze portions as well so there is enough.

Chocolate ganache:
125g heavy cream
120g semi-sweet chocolate, chopped
Heat cream in a saucepan until it is just about simmering.  Do not boil.  Pour over chocolate.  Leave until completely melted then stir to combine.  Cool to room temperature.  Whisk chocolate mixture until it has lightened slightly, fluffy and spreadable.  Use immediately by spreading evenly over one layer of the chocolate sponge and topping with the other piece of sponge.

Chocolate glaze:
110g heavy cream
105g semi-sweet chocolate, chopped
6g Golden syrup
Pinch of salt
Heat cream in a saucepan until it is just about simmering.  Do not boil.  Pour over chocolate.  Leave until completely melted then stir in golden syrup and salt until combined.  Cool to room temperature and use immediately by pouring over top of cake, allowing it to overflow to fully cover the sides.

LinkWithin

Related Posts with Thumbnails