Friday 30 December 2011

Cocoa and basil buttercream macarons


You must be now thinking that I've gone macaron crazy.  This is the third macaron post this month!


I'm still waiting for Pierre Herme's Macaron book to be delivered to me since ordering it on amazon.com a few weeks ago.  Can't promise that there won't be more macaron posts in January but I think I should try and divert my attention to something else since I'm piling up too many egg yokes in the fridge.


Some friends have asked why I keep making these bite-size macarons instead of the larger ones more commonly sold by pastry shops.  I think its because I find it more appealing being able to pop a whole macaron into my mouth at one go... Or it could also be that my first macaron experience were the luxemburgelis sold by Confiserie Sprüngli in Switzerland.  Luxemburgelis are smaller with very smooth and high dome-shaped shells. 


The basil buttercream pairs well with cocoa shells (with and without cacao nibs topping) and taste distinctly of basil - its a sweet cream with herbal notes. 


This should be my last post for 2011.  Here's wishing everyone a Happy New Year! And a great 2012 ahead!


Recipe below makes around 20 sandwiched macarons
(Adapted from Les Petit Macaron by Kathryn Gordon and Anne E. McBride)


72g almond flour
72g confectioners' sugar
12g cocoa powder
58g egg whites
1 tsp egg white powder
1/4 tsp cream of tartar
75g granulated sugar
28.5g water
1 tbls cacao nibs for topping half of the shells (optional)

Place almond flour, confectioners' sugar and cocoa powder in food processor and pulse for about 40 seconds to combine them into fine powder.  Sift through a fine-mesh strainer into a large mixing bowl.

While preparing the sugar syrup, whisk egg whites, egg white powder and cream of tartar using an electric mixer on medium speed till soft peaks form.  Switch the speed down if egg whites are at soft peaks before syrup is ready.

Heat granulated sugar and water in a small saucepan over medium to high heat.  Stir only at beginning to dissolve the sugar crystals.  Use a thermometer to measure the syrup, cooking the sugar till it reaches 118C.  Carefully pour the sugar syup into the mixer bowl while running the whisk at medium speed.  Continue whisking till stiff peaks form and the meringue has cooled down and is glossy.

Transfer the meringue into the large mixing bowl with the dry ingredients.  With a rubber spatula, fold in the meringue, folding till the batter is loose enough to drip down from the spatula back to the bowl in one continuous lava-like flow. 

Pipe batter onto silicon mat placed on baking sheet.  Top half of the shells with cacao nibs before placing into 65C preheated oven for 15 minutes.  Without removing the macarons, increase the oven temperature to 150C and bake for another 15 minutes (note that I'm using a convection oven).

Slide silicon mat off baking sheet to cool.  Wait for macarons to cool before removing macarons from silicon mat.  

Fill with basil buttercream.


Basil buttercream:

15g basil leaves
86g water
100g granulated sugar
1 1/2 egg whites
pinch of cream of tartar
pinch of fine sea salt
115g unsalted butter, cut into small cubes

Place basil leaves in water and bring it to a boil.  Remove from heat and add sugar.  Set aside for leaves to infuse for at least 20 minutes.  Transfer basil sugar mixture to a food processor and pulse for about 2 minutes till basil leaves are finely chopped.
 
Whisk egg whites, egg white powder and cream of tartar using an electric mixer on medium speed till soft peaks form.  At the same time, heat basil sugar mixture in a small saucepan over medium to high heat.  Use a thermometer to measure the syrup, cooking the basil sugar mixture till it reaches 118C.  Carefully pour the sugar syup into the mixer bowl with egg whites while running the whisk at medium speed.  Continue whisking till stiff peaks form and the meringue has cooled down and is glossy.  Add salt and butter into meringue and continue to whisk on high speed till mixture becomes smooth and fluffy.

Note: If meringue and butter doesn't combine and mixture starts to look like scrambled eggs, don't despair, and don't throw away the mixture!  Chill the mixer bowl and whisk in fridge for about 15 minutes before whisking it at medium speed till the buttercream is formed - it may take a long time (e.g. up to half hour) but the buttercream will come.  Trust me!  It may be helpful to add some additional butter (a few cubes).


Wednesday 28 December 2011

A photo essay on putting together a beef wellington

I hope everyone had a wonderful Christmas surrounded by family and friends.

As expected, we had a huge meal at home on Christmas eve.  Herr Scherrer's dad prepared a very impressive beef wellington and I had my camera handy to capture how the different layers were put together.    

We waited in eager anticipation while the beef wellington baked in the oven.  I caught the first glimpse of the beef centre as it was cut - there was just the right amount of pink in the meat.  And it tasted very juicy indeed.  

Here's the photo essay, hope you enjoy it:

Monday 19 December 2011

Orange and apricot-white chocolate caramel macarons


I'm so looking forward to Christmas Eve dinner at home.  Future father-in-law is taking over kitchen responsibilities at our place and being a retired professional chef he sure comes up with super delicious stuff! As I'm writing this I'm recalling the yummy beef wellington he made for us 2 Christmas ago!

It seems lately I'm in the mood for making macarons. The drier and cooler weather in Hong Kong now does make it much easier for macaron making.  Making macarons during the humid summer can get really frustrating.  I added orange zest to the shells to give it the citrus taste, and paired it with caramel filling made with apricot jam and white chocolate.  I found the caramel filling pretty sweet so would suggest using it sparingly when filling the shells.


Recipe below makes around 20 sandwiched macarons
Orange shells (recipe for shells adapted from Les Petit Macaron by Kathryn Gordon & Anne E. McBride):

82.5g almond flour
82.5g confectioners' sugar
1/2 pinch fine sea salt
57.5g aged egg whites
1/4 tsp cream of tartar
75g granulated sugar
28.5g water
1/2 packed tsp (about 2g) finely grated orange zest
1 drop of liquid yellow colouring
1 drop of liquid red colouring


Place almond flour, confectioners' sugar and salt in food processor  and pulse for about 40 seconds to combine them into fine powder.  Sift through a fine-mesh strainer into a large mixing bowl.

While preparing the sugar syrup, whisk egg whites and cream of tartar using an electric mixer on medium speed till soft peaks form.  Switch the speed down if egg whites are at soft peaks before syrup is ready.

Heat granulated sugar and water in a small saucepan over medium to high heat.  Stir only at beginning to dissolve the sugar crystals.  Use a thermometer to measure the syrup, cooking the sugar till it reaches 118C (the book says 113C, but I've always used 118C).  Carefully pour the sugar syup into the mixer bowl while running the whisk at medium speed.  Continue whisking till stiff peaks form and the meringue is lukewarm and glossy (the book says it'll take about 4 minutes.  I don't time myself but stopped once stiff peaks form and the meringue does not fall out when the bowl is turned upside down). 

Transfer the meringue into the large mixing bowl with the dry ingredients.  With a rubber spatula, fold in the meringue, folding till the batter is loose enough to drip down from the spatula back to the bowl in one continuous lava-like flow.  Add in orange zest and food coloring after about 5 folds.  (It took me about 45 folds in total this time, though the book says about 18 and the previous batch I made with the same recipe took me about 35 folds.)

Pipe batter onto silicon mat placed on baking sheet (I piped 3cm circles) and place into 65C preheated oven for 15 minutes.  Without removing the macarons, increase the oven temperature to 150C and bake for 13 minutes (the book says 9 minutes, but my macarons were done only at 13 minutes, and I'm using a convection oven).

Slide silicon mat off baking sheet to cool.  Wait for macarons to cool before removing macarons from silicon mat.  

Fill with apricot-white chocolate caramel.


Apricot-white chocolate caramel:

120g apricot jam
80g white chocolate, chopped
1/2 tbls grand marnier
1/2 tsp lime juice
60g granulated sugar
40g heavy cream

Heat jam in sauce pan over medium heat, constantly stirring till boils slightly.  Remove from heat and stir in white chocolate till it is melted.  Add grand marnier to the jam and chocolate mixture.  Set aside.

Heat cream in small saucepan over medium heat until it is scalding.

Heat sugar and lime juice in medium saucepan over medium heat, stiring only till sugar resembles wet sand.  

Cook till sugar turns a clear amber colour, edges begin to foam and you can smell the caramel. Remove from heat and immediately pour in cream to stop the cooking process. 

Stir in jam and chocolate mixture and pour caramel into a shallow pan so that it can cool down faster till thick and spreadable, about 1.5 hours.

Sunday 18 December 2011

Partybrot

Always looking for an opportunity to make bread at home, this weekend I brought a round loaf of partybrot to a friend's house warming.  It is a delightful item to have on the dinner table and quickly became the centre of attention with its pretty domes topped with sesame and poppy seeds.  


I've posted briefly about this german bread before in April 2010.  This time I leave behind the recipe.  I think this loaf is perfect for the holiday season if you're entertaining guests at home.  I will consider making this again on Saturday for Christmas eve dinner!  and yippe! its 6 days to Christmas!


Recipe below from "Bread" by Eric Treuille and Ursula Ferrigno

2 1/2 tsp dried yeast
250ml milk
60g unsalted butter, melted
2 tbsp granulated sugar
2 eggs, beaten
560g strong white flour
2 tsp salt

Sprinkle yeast into 100ml of milk in a bowl. Leave for 5 minutes; stir to dissolve. 
Warm remaining milk in a saucepan with butter and sugar, stirring till butter has melted. Cool until tepid then beat eggs in till evenly combined.
Mix flour and salt in a large bowl. Make well in centre and pour in yeasted milk and butter mixture. Mix in the flour to form a soft and sticky dough.
Turn dough out on floured work surface. Knead until smooth, shiny and elastic, about 10 minutes.  Dough should be soft and not dry.
Leave dough in buttered bowl and cover with tea towel to rise until double in size, about 1 to 1.5 hours.
Knock back and leave dough to rest for 10 minutes.
Divide into 19 equal pieces and shape each piece into a round smooth ball.
Arrange into greased 9.5 inch round cake tin or spring form pan (I used a slightly smaller cake tin to get higher domes), outer ring of 12 and inner ring of 6, last roll in the centre.
Cover cake tin with tea towel and leave to prove until double in size, about 45 minutes.
Brush top with egg glaze and sprinkle alternately with sesame and poppy seeds.
Bake in preheated 200C oven for 45 minutes until golden and hollow sounding when tapped (I use a convection oven and my bread was done at 30 minutes).
Turn out on wire rack to cool slightly, then wrap in tea towel to keep warm till served.

Thursday 15 December 2011

Matcha and black sesame macarons

After hearing much about Pierre Hermé's long awaited Macarons book in English, I've been looking for it in several bookstores in Singapore and Hong Kong without much success.  No worries, there is always amazon right?  So I get on amazon.com and discover it'll take more than a month for it to be delivered to me!  Argh!  So what do I do?  I go ahead and order it of course, I had to get it! And in addition I bought a kindle version of another macaron book to get me through the waiting period! =P  Kindle version means I get it right away!  No waiting! I've bought e-books in the past, but this was my first electronic cookbook.  It'll need some getting used to....

I got the electronic version of Les Petit Macarons by Kathryn Gordon and Anne E. McBride.  It was one of 2 e-books that appeared on the recommended list and this one seemed to have a slightly better review than the other.  I wasn't too sure what to expect but from the video for the book that was also available on the amazon site, it seemed like Kathryn Gordon is well-versed in macaron making.


Kathryn Gordon offers 4 different basic macaron recipes: french meringue method, italian meringue method, swiss meringue method and one of her own "Easiest French method" as she calls it in the book.  I referred to the italian meringue method right away given that is what I've been relying on, and noticed that instead of drying the piped macarons at room temperature she dries them at 95 C in the oven for 15 minutes before baking it at 175 C for 9 minutes. (If using convection ovens, she suggests reducing the temperature by 25 to 35C.)  Drying macarons in the oven at a preset temperature sounded somewhat appealing to me.  Firstly it takes only 15 minutes.  Secondly Hong Kong has varying levels of humidity and its always a challenge for me to gauge how long I need to dry the macarons before baking.  Perhaps drying it in the oven reduces this variable a little?  The book also offers a number of ideas for different flavored shells and fillings, both sweet and savory.


Separately I purchased a jar of Japanese black sesame paste last week without checking the expiry date and was disappointed to realize upon reaching home that it will expire very soon.  Immediately my head is filled with sesame flavored baking ideas aimed at using up all the sesame paste!  First up, a Japanese themed macaron - matcha flavored shells paired with black sesame filling.  Of course I was also excited to try out Kathryn Gordon's recommended drying procedure.

The conclusion?  It works!  I use a convection oven so following her advice I first dried the piped macarons at 65 C for 15 minutes in the oven and tested it by gently touching the surface with my finger.  The skin layer seems to have sufficiently formed.  I then baked one batch at 145 C for 15 minutes and another batch at 150 C for 12 minutes (the macarons were not done at 9 minutes).  I was considering to fill it with sesame buttercream but as the black sesame paste was not very strong, I was worried that I'll lose the sesame flavor by mixing it with buttercream and went with 100% black sesame paste instead.  Next up, maybe a black sesame chiffon cake?  I've been wanting to make one of those for some time.


Recipe below adapted from Les Petit Macaron by Kathryn Gordon and Anne E. McBride (Makes around 20 sandwiched macarons)

82.5g almond flour
82.5g confectioners' sugar
1/2 pinch fine sea salt
3/4 tsp matcha powder
57.5g aged egg whites
1/4 tsp cream of tartar
75g granulated sugar
28.5g water
3 drops of liquid green colouring
black sesame paste for filling

Place almond flour, confectioners' sugar and salt in food processor  and pulse for about 40 seconds to combine them into fine powder.  Sift along with matcha powder through a fine-mesh strainer into a large mixing bowl.

While preparing the sugar syrup, whisk egg whites and cream of tartar using an electric mixer on medium speed till soft peaks form.  Switch the speed down if egg whites are at soft peaks before syrup is ready.  Heat granulated sugar and water in a small saucepan over medium to high heat.  Stir only at beginning to dissolve the sugar crystals.  Use a thermometer to measure the syrup, cooking the sugar till it reaches 118C (the book says 113C, but I've always used 118C).  Carefully pour the sugar syup into the mixer bowl while running the whisk at medium speed.  Continue whisking till stiff peaks form and the meringue is lukewarm and glossy (the book says it'll take about 4 minutes.  I don't time myself but stopped once stiff peaks form and the meringue does not fall out when the bowl is turned upside down). 
Transfer the meringue into the large mixing bowl with the dry ingredients.  With a rubber spatula, fold in the meringue, folding till the batter is loose enough to drip down from the spatula back to the bowl in one continuous lava-like flow.  Add in green coloring after about 5 folds.  It took me about 35 folds in total, though the book says about 18.

Pipe batter onto silicon mat placed on baking sheet (I piped 3cm circles) and place into 65C preheated oven for 15 minutes.  Without removing the macarons, increase the oven temperature to 150C and bake for 12 minutes (the book says 9 minutes, but my macarons were done only at 12 minutes, and I'm using a convection oven).

Wait for macarons to cool before removing from silicon mat.  Fill with black sesame paste and leave in fridge over night before serving at room temperature.

Thursday 8 December 2011

Sticky date & mango mousse cake

I'm soooo looking forward to Christmas!  The office will be closed till the 28th Dec so I'll have a really long weekend to relax and probably do lots of cooking and baking!  Not to mention several Xmas feasts during which I'll certainly be stuffing myself with yummies.  The weather in Hong Kong is finally starting to cool off, there is not much to do in the office, all adding to the happy holiday feeling. =D


I must have been feeling this holiday spirit when I came up with this sticky date and mango mousse cake.  The mousse layer is light with a slight tinge of sour from the mangoes, a nice contrast with the sticky date cake layer which is heavier & sweet.   


Sticky date layer:
125g pitted dates, chopped into small pieces
1/2 tspn bicarbonate of soda
3/4 cup boiling water
62.5g butter, softened
115g brown sugar
1/2 tspn vanilla extract
1 egg
228g self raising flour

Pour boiling water over chopped pitted dates and bicarbonate of soda in a bowl, leave standing for 20 minutes.  Beat butter, sugar and vanilla till creamy. Add egg and continue beating till well incorporatd. Fold in date mixture and flour.  Pour mixture into lined 8 x 10.5 inch baking tray, making sure mixture is spread out over the tray into a thin layer (use a spatula if necessary).  You can use a smaller tray so long as its at least 6 x 6 inch but you will end up with a thicker sticky date layer.  Bake for 30 minutes (or until a skewer inserted into the centre comes out clean) in 180 C preheated oven . Leave to cool. 

Mango mousse layer:
4 gelatin sheets
188g mango puree
55g granulated sugar
1.5 tbls lemon juice
93g whipping cream (whisked till soft peaks forms)
93g plain yogurt

Soak gelatin sheets in cold water.  In a saucepan, combine mango puree, sugar and lemon juice, heating slightly just enough for the sugar to dissolve.  Remove from heat and add softened gelatin sheets, stirring till completely dissolved.  Transfer mixutre to bowl and leave to cool till room temperature before whisking in the yogurt.  Fold in the whipped cream.

Assembling the cake:
Line bottom of 6 x 6 inch square ring with parchment paper before placing on cake base.  Cut out a 6 x 6 inch piece of sticky date layer and place into bottom of cake ring.  Carefully pour mango mousse on top of sticky date layer.  Chill in fridge till mouse layer is firmly set.  To remove from cake ring gently heat the sides of the cake ring with a blow torch or wrap it with a warm towel.  Garnish the cake with pieces of mango and dates as desired.


Tuesday 8 November 2011

It's time for cookies!


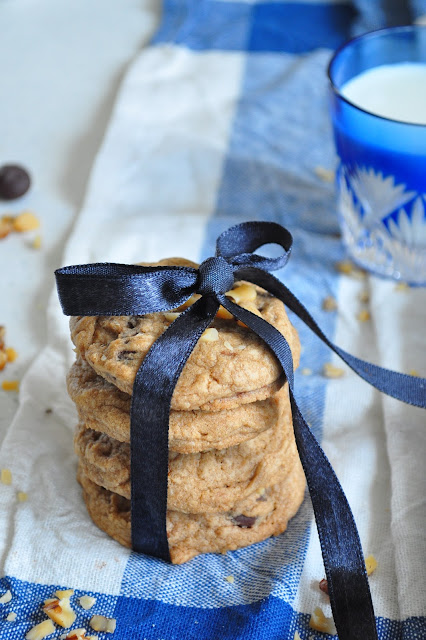
 "I love cookies warm!"  exclaimed Herr Scherrer as he excitedly grabs a cookie from the cooling rack.  He never fails to remind me of that when I make cookies at home and I agree with him wholeheartedly.  Cookies are best when they've cooled slightly but not completely.  I wish we could just pop the cookies into a microwave and get the same effect but its just never the same after its completely cooled. 


I was reminded of this again a couple of weekends ago when I made these dark chocolate walnut cookies.  The original recipe called for white chocolates with macadamia but I had none of those available at home.  We were stuck at home for a couple of hours while waiting for the cable company to upgrade our broadband speed - just enough time, though unexpected, for a quick batch of cookies.  We also have super fast internet speed now reaching several hundred mbps .  Thrilling!


Recipe adapted from Australian Women's Weekly's "Biscuits & Slices", makes about 30 cookies.

125g butter, chopped
1 teaspoon vanilla essence
1 teaspoon grated orange rind
200g firmly packed brown sugar
1 egg
225g plain flour
190g dark chocolate bits
50g finely chopped walnuts

Beat butter, essence, rind, sugar and egg in small bowl with electric mixer until smooth.  Stir in flour and chocolate bits.  Drop level tablespoons of mixture about 5cm apart onto greased oven trays, top with nuts.  Baked cookies in 180 C preheated oven about 15 minutes or until firm.  Cool on wire racks.


Thursday 13 October 2011

Visiting a kopi luwak plantation

I always start my day with a warm cuppa coffee, even on the weekends or lazy days that I wake closer to noon.  We have a little nespresso machine at home which makes it real easy to get a cup going even when I’m half awake and groggy in the morning.  I love standing over the machine as coffee gently flows into the cup, sniffing away at the fresh smell of coffee.  

(US$6 for this espresso size cup of kopi luwak)

Herr Scherrer & I were in Bali on a short holiday a few weeks ago and we had the chance to visit a small coffee plantation specializing in the production of kopi luwak, also known as the civet coffee. We also took some photos that I want to share here.

(Civet cat - key to production of kopi luwak)

Believed to be one of the world's most expensive coffee, kopi luwak's manufacturing process is somewhat unique and a little peculiar.  Civet cats are fed ripe coffee cherries and the coffee beans pass through its digestive tract intact and is then defecated.  Thereafter, the beans are collected (yes yes a little yucky, collected from the civet's droppings), thoroughly washed, dried and roasted.  As a result of stomach enzymes of the civet, coffee produced from these beans is believed to have a unique aroma and less bitter. 


(Fresh coffee berries that are fed to the civet cats)


(Various types of coffee that we tried at a little rustic cafe within the
coffee plantation - with ginger, with cocoa, with vanilla, etc)


(Yes, this is poop of the civet cat - you can see intact coffee beans in it)

(Coffee beans collected from the droppings of the civet cat. 
It'll have to be washed & dried before roasting.)


(Trays of coffee beans collected from the droppings of the civet cat. 
The ones towards the right have been washed clean.)

(Coffee beans are roasted over fire)


(Left: Roasted coffee beans are pound to ground using this; Right: Sifting ground coffee power)


(Coffee berries on trees, still green and not ready for picking)


We paid about US$6m for a small espresso cup of this kopi luwak.  There was a little rustic cafe within the plantation.  It was definitely good coffee, but I’m not quite sure if I would be able to tell the difference in a taste-test.  We had an interesting time though walking through the small plantation and snapping photos.


(A little rustic cafe serving kopi luwak within the plantation)

Within the same plantation we also saw them growing/producing cocoa, vanilla & cinnamon - all useful baking ingredients!

(Cocoa plant & fruit)

(Left: Vanilla pods; Right: Cinnamon tree bark)


LinkWithin

Related Posts with Thumbnails