Sunday, 4 September 2011

A quick approach to raspberry cheesecake


We had some guests over for dinner last Saturday evening and I didn't have time to start working on any sort of dessert till about 3pm in the afternoon...  I had a fresh tub of Ben & Jerry vanilla ice cream in the freezer which could certainly pass off as dessert, but I think my guests expected much more out of me.  At least i would... 

So what do i do??  I know most cheesecake recipes advise the need to refrigerate for at least 6 hours or overnight, but the preparation itself is almost too quick & easy... it was all I could manage in the 1.5 hours before my guests were due to arrive... After some consideration I decided to take the risk! After all, if the cheesecake is not ready in time, I will still have the B&J ice cream as back up.

I used a fairly common baked cheesecake recipe that I've tried before (http://www.marthastewart.com/340227/raspberry-swirl-cheesecake).  My preference is always the water bath method which eliminates the chances of cracks and cooks the cheesecake gently.


There are tons of tutorials and guides available out there for cheesecakes, but here's three points I personally feel is most important:
1) Rely on the water bath method
2) Beat the mixture as little as possible once adding the eggs, as excessive beating will cause the eggs to trap air, thereby increasing the chance of cracks
3) Leave the cheesecake in the oven for another hour or so after turning off the oven.  This allows the cheesecake to be further "cooked". 


Was my cheesecake done in time for serving?  After cooling it for about 1 hour at room temperature, I popped it into the freezer for about 2.5 hours throughout the entire time we had dinner.  Once we were done with dinner I removed it from the freezer, removed the cake ring and served it straightaway with some left over raspberry puree that was also chilled in the fridge throughout dinner.

The cheesecake was perfectly fine even though it hadn't been refrigerated for 6 hours or overnight.  A couple of my guests took a second serving!  Given a choice, I wouldn't try something this last minute again, but it was good that everything turned out right just in time... Whew! 

I took this shot below of the entire cake before it was cut and served.  The rest of the shots above I took the day after with a few leftover pieces.


Thursday, 25 August 2011

Streusel coffee cake with peaches... and some photos from the last few months of absence

Its been so long since my last post that I got a surprise logging into blogger - Its got a fresh new look! I think I like it, though its taking me a bit more time to navigate around looking for the right buttons.

I don't really have a good reason for not blogging the last few months.  Its not like I've stopped having fun in the kitchen - I just haven't been motivated to take photos and documenting the experience.  One contributing factor is I've been baking / cooking more towards the evening so there is not much daylight available for pictures, and I still haven't quite figured out how to work around the mood lighting we have at home.  Another "excuse" (if marginally acceptable) is the unbearably hot and extremely humid summer weather we've been getting here in Hong Kong - it makes me lazy!  Though it also means we've been getting quite a bit of days with clear blue skies - see photos below (part of the Victoria Harbor taken from the 75th floor of International Commerce Centre;).  Ironically, as I'm writing this the sky outside is turning grey and gloomy, and a thunderstorm is clearly brewing...


Let's me get back to the title of this blog before we continue to digress: I made a peach streusel coffee cake last Saturday afternoon and managed to squeeze in this shot (below) next to the window  right before sunset.  I had some peaches at home that were fully ripen, and found this recipe on the internet: http://www.williams-sonoma.com/recipe/peach-streusel-coffee-cake.html.  Its the first time I've made something with streusel - I used 1/4 instead of 1/3 cup of brown sugar specified in the recipe as I didn't want something too sweet.  In my next attempt I would also reduce the amount of granulated sugar slightly as well.  The coffee cake was moist and blended beautifully with the peaches and streusel.  Truly perfect for an afternoon snack with coffee or tea, especially after a good swim under clear blue skies!  


So what else have I been up to this summer?  I only have a couple of fairly decent shots to share; mostly taken late in the evening, so I hope you'll excuse me if the photos are not quite up to standard...


Top right and bottom left: banana walnut cake; 
Top left: unbaked maracon shells; 
Bottom right: completed macaron shells (can't quite remember what I filled it with) 


This was another batch of maracons: plain shells with poppy seeds filled with salted caramel filling. 

Following our impromptu home made pizza experiment, Herr Scherrer & I did continued making more pizzas at home, though with a little more planning:


Friday, 22 April 2011

Impromptu home made pizza

Out of the blue, Herr Scherrer had a sudden inspiration to make our own pizza for dinner last week. I've never attempted preparing pizza dough from scratch so it became an impromptu "experiment".

It was a weekday night after work so we didn't have a lot of time. No time to plan for proper ingredients. It was like a surprise pizza challenge - we had to cope with whatever ingredients we happen to have at home. A quick google search and I found this pizza dough recipe from Jamie Oliver: http://www.jamieoliver.com/recipes/pizza-recipes/pizza-dough, and thankfully I had all the ingredients listed in my kitchen. I threw everything into my trusted bread machine and cut the rising time to 45 minutes as we were getting hungry. =P


While I worked on the dough, Herr Scherrrer planned the pizza toppings - he popped his head into the fridge and dug out mushrooms, tomatoes, spinach. Basically whatever he could find! We had a jar of tomato pasta sauce which we spread on the rolled out dough. We also went with our intuition and added olive oil, herb spices, salt and pepper.

The end result? It was surprisingly yummy for an impromptu pizza put together without much planning. Will definitely try it again with different toppings!

Wednesday, 20 April 2011

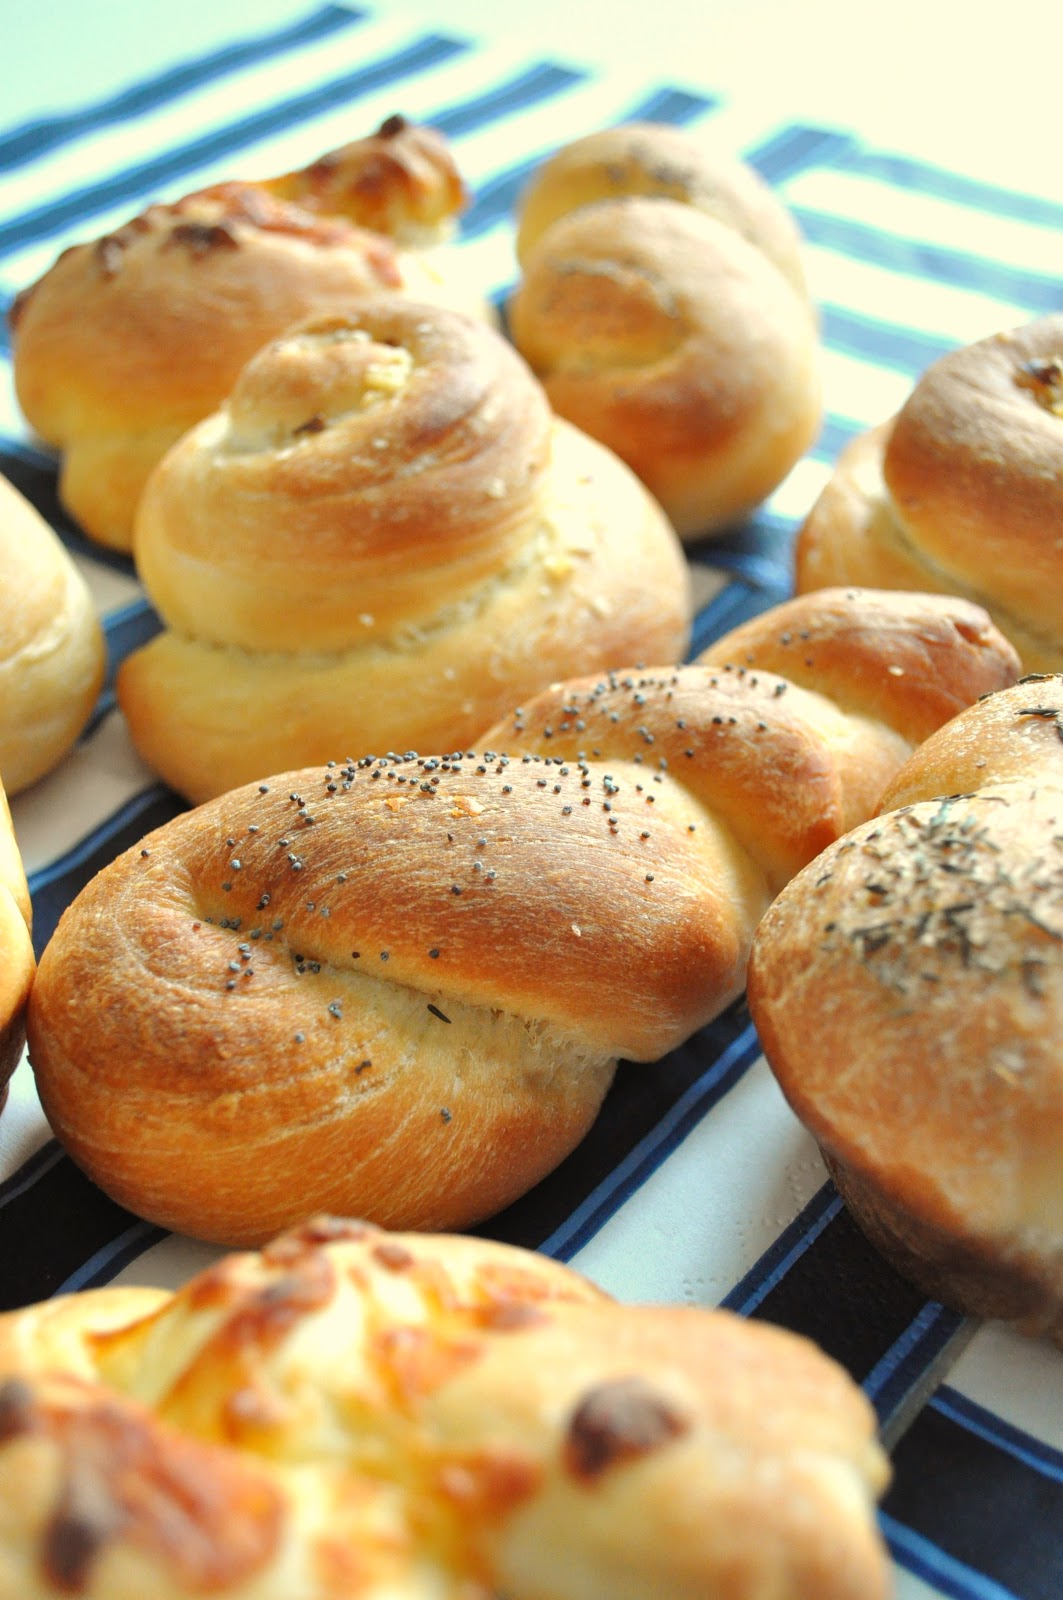
Assorted bread rolls


Playing with bread dough is fun fun fun!!  I made an assortment of bread rolls over the weekend.  Before you glance at the pictures and wonder if its a lot of work, let me reassure you that its the same bread dough for all of these dinner bread rolls.

 (In the centre is the twisted roll topped with poppy seeds.)

The real fun starts after the dough has completed its first rise.  After knocking back the risen dough and dividing it into equal pieces of around 60 to 65g each, the individual pieces can be shaped into a variety of assorted rolls.  Once proven, the rolls can be topped with a variety of seeds, nuts, or herbs of choice, including cheese.  There's so much room for creativity!  In the photos posted here you'll see the snail roll topped with crushed walnut, twist roll topped with poppy seeds, knot roll topped with cheese and cloverleaf roll topped with thyme.

 (Snail roll topped with crushed walnuts)

This dough is forgiving and very easy to work with.  It can be prepared using a bread machine, removing after its risen, which makes it very convenient.   In my opinion these are best served warm. 

(Cloverleaf roll topped with thyme)

The following recipe is taken from "Bread" by Eric Treuille and Ursula Ferrigno.

Ingredients:
- 2.5 tsp dried yeast
- 250 ml milk
- 60g unsalted butter, melted
- 30g, melted butter, to glaze and grease bowl and baking sheet
- 2 tbsp granulated sugar
- 2 eggs, beaten
- 560 g strong white flour
- 2 tsp salt

(Knot roll topped with cheese)


Method:
1. Sprinkle yeast into 100ml of the milk in a bowl.  Leave for 5 minutes; stir to dissolve. Warm the remaining milk in a saucepan with the butter and sugar.  Stir continously, until the butter has melted.  Cool until tepid, then beat in the eggs until evenly combined.
2. Mix the flour and salt together in a large bowl. Make a well in the centre and pour in the yeasted milk and the butter mixture.  Mix in the flour to form a soft, sticky dough.
3. Turn the dough out on to a floured work surface.  Knead until smooth, shiny, and elastic, about 10 minutes.  Knead in extra flour, 1 tablespoon at a time, if the dough is too sticky.  Resist adding too much flour - the dough should not be dry, but soft.
4. Put the dough in a buttered bowl and cover with a tea towel.  Leave to rise until doubled in size, 1- 1.5 hours.
5. Knock back, then leave to rest for 10 minutes.  Divide the dough into 16 pieces and shape as follows: 
(a) 4 snail rolls: roll 4 pieces of dough into 30 cm rope each.  Form each rope into a coil, tucking under the end.
(b) 4 baker's knot roll: roll 4 pieces of dough into 30 cm rope each.  Make a loose knot with each rope, leaving enough room for the dough to expand during proving into a tight knot.
(c) 4 cloverleaf roll: separate 4 pieces of dough into 3 even portions each.  Shape each piece into a round roll.  Please 3 balls in each buttered cup of a muffin tin.
(d) 4 twist roll: roll 4 pieces of dough into 30 cm rope each.  Fold each rope in half, and twist; pinch ends to seal.
6. Arrange shaped snail rolls, baker's knot roll and twist roll 5pm apart on buttered baking sheets.  Cover with a tea towel and prove until double in size, about 30 minutes.  Leave cloverleaf roll in muffin tin to prove until double in size, also 30 minutes.
7. Glaze top of the bread rolls with remaining butter, top with nuts, seeds, cheese, spices as you prefer.
8. Bake 15 to 20 minutes in preheated 220 C oven, cool on wire rack.


Sunday, 30 January 2011

Black forest verrines

The past month was full of activity!  First I had my move to Discovery Bay right before Christmas, then it was Christmas and New Year celebrations... in mid January a major deal at work finally closed (something I've been working on for months so that was a huge relief).  I also managed to squeeze in a snowboarding trip to Niseko (plenty of amazing fresh powder everyday!)... And in a blink Chinese New Year is now almost here!

 
With plenty going on, I've not had the chance to spend much time in my new kitchen which is strange given it was really the kitchen that sold the apartment.  Its an open kitchen which gives me much more working space compared to my previous one - great for all sorts of baking and cooking projects!  This weekend I made up for my absence in the kitchen by working on something that's been swirling around in my head for some time - Black forest verrines.


The black forest cake is such a traditional favorite that I thought it might be fun to give it a not-so-traditional twist.  I laid the chocolate gateau, chocolate mousse, dark cherries and cream mousse layers down in a small cup rather than building it up as a full cake.  Pre-soaking the dark cherries in rum gives this dessert a real oomph! 


Recipe below makes 10 verrines

Chocolate gateau layer:
- 3 eggs
- 60g sugar
- 55g plain flour
- 10g cocoa powder
- 30g melted butter
Chocolate mousse layer:
- 80g dark couverture
- 130g whipping cream
Dark cherries layer:
- 20 pitted dark cherries (from a can)
- 25g rum
Cream mousse layer:
- 15g sugar
- 170g whipping cream

Soak cherries in rum. 
Line a square cake tin that is around 7 by 7 inch.  Sieve plain flour and cocoa powder together and set aside. Hand whisk eggs and sugar over bain marie till it reaches 40C.  Using an electric whisk, beat till egg mixture becomes light and frothy.  Fold in flour and cocoa powder mixture.  Fold melted butter into mixture.  Bake in preheated 170C oven for 25 to 30 minutes.  When cooled, cut cake into 2 layers and into small pieces that would fit into cups used for the verrines. Each verrine would need 3 layers of chocolate gateau.
Whisk 130g of whipping cream till soft peaks forms.  Melt dark couverture over bain marie before folding into whipped cream until an even mousse forms.
Whisk remaining whipping cream with 15g sugar till soft peak forms.

To assemble the verrines, place 1 layer of chocolate gateau at the bottom of a small glass cup.  Top with a layer of chocolate mousse followed by a 2nd layer of chocolate gateau.  Place 2 dark cherries into each cup on top of the 2nd chocolate gateau layer and distribute any remaining rum mixture among all cups, allowing it to soak into the 2nd chocolate gateau layer.  Fill in the spaces between the cherries with cream mousse, followed by a 3rd chocolate gateau layer.  Top the cups with remaining cream mousse.  Sprinkle some cocoa powder over top of each verrine.  Once the cream mousse has firmed up in the fridge, a cherry (or other fruits) may be added on top as desired.


Sunday, 19 December 2010

Strawberry linzer cookies

I'm awfully excited about spending Christmas in my new home!! Due to move in 4 days, I've been busy ensuring the house renovations get completed in time, contacting the movers, and getting started on packing stuff into boxes... busy busy busy!!! Thank goodness things at work has lightened considerably.


Trying to clear as much as possible out of my fridge before the house move, I finally got down to baking those linzer cookie dough I prepared and kept in the freezer about 2 weeks ago. Linzer cookies are one of my favorites during the Christmas holiday season. I wish I had more time to make them into interesting holiday shapes... Merry Xmas everyone!!


Ingredients:

110 g ground almond
260 g plain flour
1/2 teaspoon cinnamon
1/4 teaspoon salt
227 g unsalted butter, at room temperature
135 g caster sugar
1 teaspoon vanilla essence
2 large egg yolk
zest of 1 lemon
3/4 cup strawberry preserves

Method:
Sift together flour, cinnamon and salt in a bowl, then set aside. Using an electric mixer, beat butter and sugar until light and fluffy, add in the vanilla essence, egg yolks, lemon zest and ground almonds while continuing to beat. Add in the flour mixture and beat until just combined. Shape dough into a round ball and wrap in plastic. Keep in the fridge until firm (about 1 hour) or up to a few days. At this point the dough can also be stored in the freezer for a few weeks.
Roll dough between 2 baking sheets until about 0.6cm thick. Using 5cm cookie cutters of any shape desired, cut out pieces of dough, placing them on prepared baking trays around 2cm apart. Using a smaller cookie cutter, cut out the centers of half of the cookies. Bake for around 12 to 15 mins in a preheated 180 C oven. Cool on wire rack.
When ready to assemble cookies, place strawberry preserves in a saucepan and heat gently. Spread around 1/4 to 1/2 teaspoon of heated strawberry preserves on the bottom of a full cookie, top with a cookie without centers, sandwiching them together firmly.


Sunday, 5 December 2010

Galette aux pommes (Apple galette)

I do realize its been over 2 month since my last post. Work has gotten the better of me lately... This weekend I got back into the kitchen with a vengeance! I made chicken cordon bleu on Friday for dinner (no pictures unfortunately as we were hungry!), linzer cookie dough on Saturday (stored in the freezer in advance preparation of some christmas cookie baking coming up), and a galette aux pommes for tea on Sunday which I'm sharing with you here.


I love how free form galettes can be. It can be made with a variety of fruits or fruit compote and in almost any shape one prefers. There are also both sweet and savory versions. To keep it as a light snack I made this one without any cream filling.


Recipe below adapted from Australian weekly's "Pies & Tarts"

Ingredients:
- 300g pâte feuilletée
- 2 large apples
- 1 tbsp lemon juice
- 1/2 tbsp caster sugar
- 30g butter, chopped
- 1 tbsp fruit glaze (or apricot jam)

Method:
Preheat oven to 240 C.
Roll puff pastry into shape of your choice on a lightly floured surface till around 3mm thick. Place onto oven tray and turn edges in around 1.5cm, pressing down lightly. Set pastry aside. Remove core from apples and slice them into thin pieces. Toss apple slices in lemon juice. Arrange apple slices on pastry. Sprinkle sugar over apple slices and dot with half the butter.
Reduce oven to 190C, place galette in oven and bake for 20 minutes. Dot with remaining butter and bake for a further 25 - 30 minutes until browned.
Brush hot galette with warmed fruit glaze (or apricot jam that has been warmed and sieved).
If desired, serve warm with ice cream.


Tuesday, 14 September 2010

Pumpkin & apple muffin, with raisins & walnuts


Yes, you read the title right! This is one muffin filled with plenty of goodness! Made with pumpkin & apple purees, plus raisins and walnuts to round off the yummy-ness... And, there's no fat used in this recipe. Convinced? I hope so... hahaha...


Following recipe makes 9 medium sized muffins:

Ingredients:

210g plain flour
260 to 280g white sugar (adjust based on personal preference)
1/2 tsp baking powder
1/2 tsp baking soda
1/2 tsp salt
1/4 to 1/2 tsp cinnamon (adjust based on personal preference)
1/4 to 1/2 tsp ground cloves (adjust based on personal preference)
2 eggs
290g pumpkin puree
80g apple puree
40g chopped walnuts
90g raisins


Method:
Preheat oven to 175 C. Grease muffin pans or line with muffin cups. Combine flour, sugar, baking powder, baking soda, salt, cinnamon, and ground cloves together in a bowl. Separately mix the eggs, pumpkin, and apple puree together smooth. Add wet mixture to the dry ingredients and mix till just combined. Be careful not to over stir. Stir in carefully the raisins and walnuts. Spoon batter into the prepared muffin pans or cups. Bake for 35 minutes in the preheated oven, or until a toothpick inserted into the center comes out clean.

Tuesday, 7 September 2010

Pumpkin bread


Nope, its not yet thanksgiving but there's always no harm in making some yummylicious pumpkin bread, which is exactly what I did last weekend. This bread has a beautiful golden crumb that somehow reminds me of bright sunny days. I love its slightly sweet taste and soft crust... not to mention its a healthy choice!


Recipe below is adapted from Bread by Eric Treuille & Ursula Ferrigno. It makes a tiny loaf that's just nice for 2 of us at home. You can double the recipe if you prefer a full 500g loaf.

Ingredients:
- 150g pumpkin puree
- 1 tsp dried yeast
- 1 tsp honey
- 250g white bread flour
- 1 tsp salt
- 1/2 tbsp milk for glazing
- nuts or seeds of choice for sprinkling on top

Method:
Sprinkle yeast into 60ml of water. Leave for 5 minutes, add honey and stir to dissolve. Mix flour and salt in a large bowl. Make a well in the centre. Add the yeast mixture followed by pumpkin puree. Gradually mix in the flour to form a fairly firm, coarse, sticky dough. If its too dry, add a few tablespoons of water. Turn the dough out on a lightly floured surface and knead till smooth, silky and elastic, about 10 minutes. Put the dough into a clean bowl and cover with a tea towel. Leave to rise until double in size, about 1.5 hours. Knock back, then leave to rest for 10 minutes. Shape dough into a round loaf. Place on an oiled baking sheet and cover with a tea towel. Prove until doubled in size, about 1 hour. Brush the dough with milk glaze and sprinkle with nuts or seeds of choice. Bake in preheated 220 C oven for 25 to 30 minutes until golden and hollow sounding when tapped underneath. Leave to cool on wire rack.


Monday, 23 August 2010

Earl grey & baileys milk chocolate mousse cake


I realized its been about a month since my last post.  For 2 weeks I was away in Europe on a holiday and upon return work got the better of me for another 2 weeks... It wasn't until this weekend that I finally found some time for therapeutic baking!  

I first made this mousse cake about a year ago when earl grey flavored desserts got very popular in Hong Kong.  This was before I started this blog, hence it was never written about in a post.  I wish I had a shorter and more fanciful name that could adequately describe the perfect blend of earl grey, baileys liquor and chocolate... well, if you have any suggestions feel free to let me know!


There are 3 main parts to this dessert: butter génoise as base, a layer of baileys milk chocolate mousse set over the génoise in the middle, and earl grey mousse (in a dome shape) on the top.  A layer of dark chocolate wrap is added round the mousse cake to finish off, adding both flavor and aesthetics.  It might all sound very time consuming given the many parts to this but each part takes only a short amount of time to complete.  None of the steps are too complicated.  Also, the 2 mousses are set separately and assembled only when both are ready so saving a considerable amount of time. For me, the unforgettable taste of earl grey, baileys and chocolate deliciously harmonized in one single dessert makes it worth it! =P


Recipe below makes 8 individual cakes using 6-cm cake rings & dome molds

Ingredients:
1. For the butter génoise
-  2 eggs
- 40g sugar
- 40g plain flour, sifted
- 20g unsalted butter

2. For the baileys milk chocolate mousse
- 80g milk couverture
- 130g whipping cream
- 20g baileys liquor
- 1 sheet gelatin (2.5g)

3. For the earl grey mousse
- 11g earl grey tea leaves
- 125g fresh milk
- 175g whipping cream
- 50g egg yolks
- 40g sugar
- 2.5 sheets gelatin

Method:
1. For the butter génoise
Preheat over to 180 C.  Hand-whisk eggs and sugar over bain marie till mixture reaches 40 C.  Using an electrical whisk, beat eggs and sugar on high speed till fluffy and peaks form.  Fold flour into egg mixture in 3 batches.  Be careful not to overmix. Melt butter over bain marie, add a scoop of egg & flour mixture and mix well.  Fold mixture back into remaining egg & flour mixture and fold gently till batter surface is uniformly shiny.  Pour into 9-inch round cake tin and bake for 18 mins.  Let cool before cutting into small 5-cm rounds placed at the bottom of lined 6-cm cake rings.

2. For the baileys milk chocolate mousse
Beat whipping cream on medium speed till soft peak forms, set aside.  Soak gelatin sheet in cold water for a few minutes till it blooms.  Melt gelatin sheet over bain marie, then add 1 teaspoon of whipped cream and mix well.  Keep gelatin mixture over bain marie.  Melt milk couverture over bain marie.  When its fully melted, fold in 1/3 whipped cream, then add in gelatin mixture and mix well.  Fold in remaining 2/3 whipped cream into mixture, then gently mix in baileys.  Pour mousse into lined cake rings over butter génoise.  Leave for about 2 hours in refrigerator till set.

3. For the earl grey mousse
Soak gelatin sheets in cold water for a few minutes till it blooms. Prepare earl grey milk by boiling earl grey leaves and milk in a small sauce pan.  Cover sauce pan for 5 minutes after boiling to intensify tea flavor in the milk  Strain leaves and ensure there is 80g of earl grey milk for the mousse. Boil prepared earl grey milk and whipping cream together.  Whisk egg yolk and caster sugar till frothy, then pour in 1/3 of earl grey mixture and mix well.  Pour egg mixture back into remaining 2/3 earl grey mixture and boil, stirring constantly, till mixture thickens slightly.  Add gelatin leaves and mix well.  Pour mousse into 8 pieces of 6-cm dome molds and leave for about 2 hours in refrigerator till set.

4. Assembly
Remove baileys milk chocolate mousse from cake rings (using hot towel or flame torch).  Gently remove earl grey mousse from dome molds (by carefully dipping bottom of molds in hot water, taking care not to allow water into the mousse) and place each dome on top of each baileys milk chocolate mousse layer.  Wrap exterior of individual cakes with dark chocolate, leaving top of dome layer visible.  Top with dark chocolate decoration if desired.


LinkWithin

Related Posts with Thumbnails